
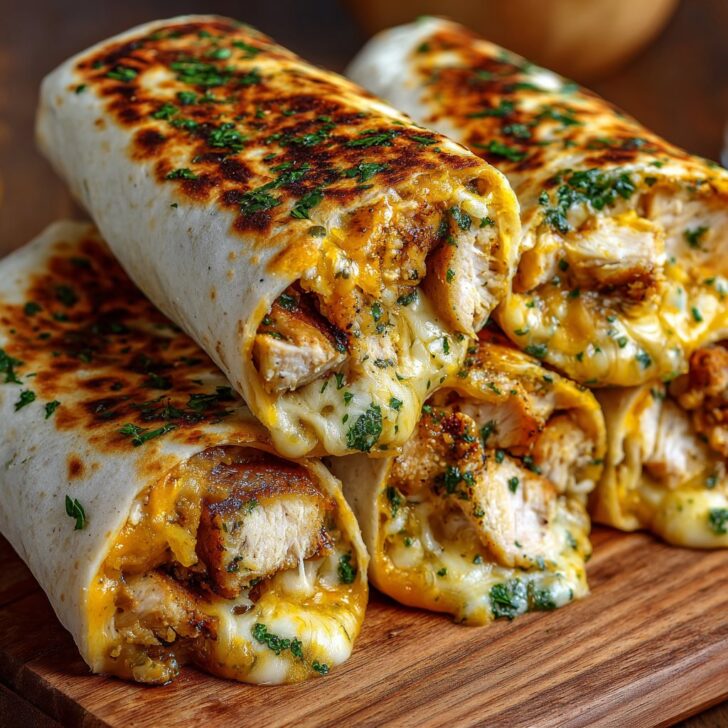

Hey y'all! If you're searching for the ultimate comfort food that's loaded with flavor, look no further than these Ooey-Gooey Cheesy Garlic Wraps with Chicken. Each bite bursts with melty cheese, tender chicken, and rich garlicky goodness, all nestled in a toasty wrap. They're perfect for family dinners, game day snacks, or any time you crave something indulgent and satisfying. So, grab your apron—let's get cooking!
Why You'll Love This Ooey-Gooey Cheesy Garlic Wraps with Chicken Recipe
- Ready in just 30 minutes, making it ideal for busy weeknights.
- Combines juicy chicken, melty cheeses, and aromatic garlic for unbeatable flavor.
- Kid-friendly and customizable with your favorite add-ins.
- Leftovers reheat beautifully for next-day lunches.
- Perfect for parties, potlucks, or cozy nights in.
Ingredients for Ooey-Gooey Cheesy Garlic Wraps with Chicken
- 2 cups cooked chicken breast, shredded or chopped
- 4 large flour tortillas (10-inch)
- 1 ½ cups shredded mozzarella cheese
- 1 cup shredded cheddar cheese
- 3 tablespoons unsalted butter
- 4 garlic cloves, minced
- 2 tablespoons fresh parsley, chopped (plus extra for garnish)
- ¼ teaspoon crushed red pepper flakes (optional)
- Salt and pepper, to taste
- Nonstick cooking spray or a drizzle of olive oil
How to Make Ooey-Gooey Cheesy Garlic Wraps with Chicken
Step 1: Prepare the Cheesy Garlic Butter
In a small saucepan, melt the butter over medium heat. Add minced garlic and sauté for 1–2 minutes until fragrant but not browned. Stir in chopped parsley, red pepper flakes (if using), and a pinch of salt and pepper. Remove from heat and set aside.
Step 2: Assemble the Wraps
Lay out the flour tortillas on a clean surface. Brush each tortilla with the garlic butter mixture, reserving a little for later. Evenly distribute the cooked chicken, mozzarella, and cheddar over each tortilla.
Step 3: Roll and Sear the Wraps
Tightly roll up each tortilla burrito-style—fold in the sides, then roll from the bottom up. Brush the outside of each wrap with the remaining garlic butter.
Step 4: Toast to Ooey-Gooey Perfection
Heat a large skillet or grill pan over medium heat and coat lightly with nonstick spray or olive oil. Place the wraps seam-side down and cook for 2–4 minutes per side, pressing gently, until the outside is golden brown and the cheese is thoroughly melted. Cut in half, garnish with extra parsley, and serve hot!
Notes for Making Ooey-Gooey Cheesy Garlic Wraps with Chicken
- For extra cheesy wraps, add an extra ½ cup of cheese or use a cheese blend. Explore different cheeses here.
- Use rotisserie chicken for convenience and extra flavor.
- If you prefer a crispier finish, bake wraps at 425°F (220°C) for 8–10 minutes after searing.


Ooey-Gooey Cheesy Garlic Wraps with Chicken Variations
- Spicy Buffalo: Toss chicken with buffalo sauce and add blue cheese crumbles for a spicy kick.
- Veggie Lover's: Add sautéed bell peppers, mushrooms, or spinach for extra veggies.
- Low-Carb: Use low-carb tortillas and swap in grilled chicken breast.
Required Equipment for Ooey-Gooey Cheesy Garlic Wraps with Chicken
- Large skillet or grill pan
- Small saucepan
- Pastry brush
- Knife and cutting board
- Measuring cups and spoons
How to Store Ooey-Gooey Cheesy Garlic Wraps with Chicken
Let wraps cool to room temperature, then wrap tightly in foil or plastic wrap. Store in an airtight container in the refrigerator for up to 3 days. To reheat, warm in a skillet over medium-low heat or in a 350°F (175°C) oven for 10 minutes until heated through.
Serving & Pairing Suggestions for Cheesy Garlic Chicken Wraps
Serve these wraps alongside a crisp green salad, oven-baked fries, or a bowl of tomato soup for a cozy meal. They're also delicious with a dollop of ranch or garlic aioli for dipping!
Pro Tips for the Best Ooey-Gooey Cheesy Garlic Wraps with Chicken
- Don't overcrowd the pan—cook wraps in batches for even browning and melty cheese.
- Let wraps rest for 2 minutes before slicing to prevent cheese from oozing out.
- Want to learn more about safe chicken handling? Check out these chicken safety tips.
Ooey-Gooey Cheesy Garlic Wraps with Chicken FAQ
- Can I make these wraps ahead of time?
- Yes! Assemble and store un-toasted wraps in the fridge for up to 24 hours, then cook when ready to eat.
- What’s the best cheese for maximum gooeyness?
- Use a blend of mozzarella and cheddar, or add Monterey Jack for even more stretch and flavor.
- Can I freeze Ooey-Gooey Cheesy Garlic Wraps with Chicken?
- Absolutely! Wrap tightly in foil and freeze for up to 2 months. Thaw overnight in the fridge before reheating.
Prep Time, Cook Time & Total Time
- Prep Time: 10 minutes
- Cook Time: 20 minutes
- Total Time: 30 minutes


Ingredients
- 2 cups cooked chicken breast, shredded
- 1 ½ cups shredded mozzarella cheese
- 1 cup shredded cheddar cheese
- 4 large flour tortillas
- 3 tablespoons unsalted butter
- 3 cloves garlic, minced
- 2 tablespoons chopped fresh parsley
- ½ teaspoon salt
- ¼ teaspoon black pepper
Instructions
-
1In a small saucepan over medium heat, melt the butter. Add the minced garlic and cook for 1-2 minutes until fragrant. Stir in the chopped parsley, salt, and black pepper. Remove from heat.
-
2Lay out the flour tortillas on a clean surface. Evenly distribute the shredded chicken, mozzarella cheese, and cheddar cheese onto each tortilla.
-
3Drizzle the garlic butter mixture over the chicken and cheese on each tortilla.
-
4Fold in the sides of each tortilla and roll them up tightly to form wraps.
-
5Heat a large nonstick skillet over medium heat. Place the wraps seam-side down and cook for 2-3 minutes per side, or until golden brown and the cheese is melted.
-
6Slice the wraps in half and serve warm, garnished with extra parsley if desired.
Approximate Information for One Serving
Nutrition Disclaimers
Number of total servings shown is approximate. Actual number of servings will depend on your preferred portion sizes.
Nutritional values shown are general guidelines and reflect information for 1 serving using the ingredients listed, not including any optional ingredients. Actual macros may vary slightly depending on specific brands and types of ingredients used.
To determine the weight of one serving, prepare the recipe as instructed. Weigh the finished recipe, then divide the weight of the finished recipe (not including the weight of the container the food is in) by the desired number of servings. Result will be the weight of one serving.
Did you make this recipe?
Please consider Pinning it!!