
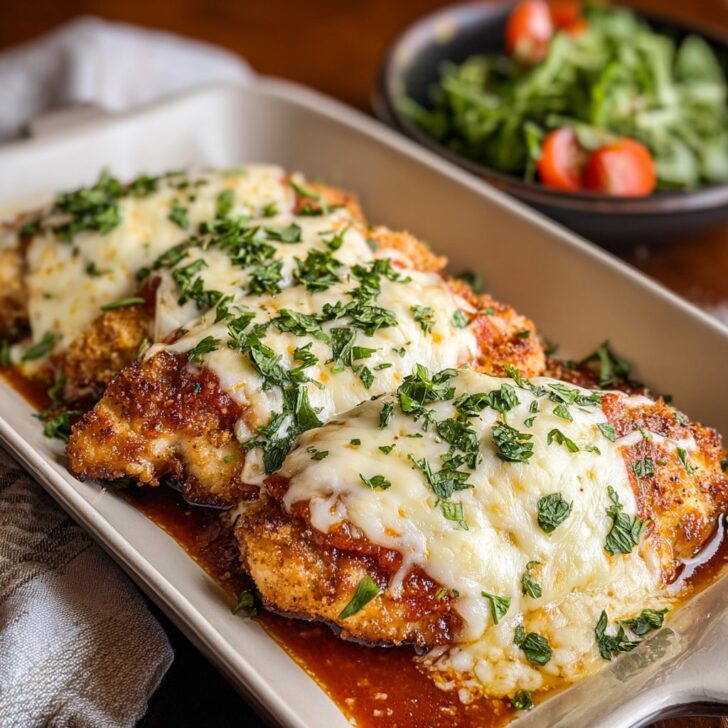

Hey y'all! If you're craving something crunchy, cheesy, and utterly crave-worthy, this Chicken Romano is about to be your new weeknight obsession. This Italian-American favorite combines juicy chicken breasts with a golden Parmesan-Romano crust that's crisp on the outside and tender inside—just the thing for family dinners, quick get-togethers, or impressing guests! Let's get cooking!
Why You'll Love This Chicken Romano
- Crispy cheese-crusted chicken is delightfully tender and flavorful every single time.
- Ready in under 40 minutes, making it perfect for busy evenings.
- Family-friendly and guaranteed to be a hit with both kids and adults.
- Easy to adjust with gluten-free or low-carb options.
- Packed with the comforting, savory tastes of Italian-American cuisine.
Chicken Romano Ingredients
- 4 boneless skinless chicken breasts (about 6 oz each)
- 1 teaspoon salt
- ½ teaspoon black pepper
- ½ cup all-purpose flour
- 3 large eggs
- 2 tablespoons water
- ½ cup grated Romano cheese
- ½ cup grated Parmesan cheese
- 1 cup Italian-style breadcrumbs
- 3 tablespoons olive oil, plus more as needed
- 2 tablespoons unsalted butter
- Lemon wedges, for serving
- Fresh parsley, for garnish
How to Make Chicken Romano: Step-by-Step Directions
Step 1: Prep the Chicken
Place the chicken breasts between two sheets of plastic wrap and gently pound them to ½-inch thickness with a meat mallet for even cooking. Season both sides with salt and pepper.
Step 2: Set Up the Breading Station
Pour the flour onto a large plate. In a shallow bowl, whisk together eggs and water until well combined. In another dish, mix Romano cheese, Parmesan cheese, and breadcrumbs.
Step 3: Bread the Chicken
Dredge each chicken breast in flour, shaking off excess, dip in egg mixture, then coat thoroughly in the cheese-breadcrumb mix. Press the breading on firmly for a thick, crispy crust.
Step 4: Cook the Chicken Romano
Heat olive oil and butter in a large skillet over medium heat. When hot, add breaded chicken breasts (work in batches if needed). Cook for 4-5 minutes per side, or until golden brown and the internal temperature reaches 165°F (75°C). Add more oil if the pan gets dry.
Step 5: Serve
Transfer Chicken Romano to a plate lined with paper towels to drain. Serve hot, garnished with parsley and lemon wedges.
Notes for Perfect Chicken Romano
- For extra-crispy crust, chill breaded chicken in the fridge for 20 minutes before frying.
- You can substitute homemade breadcrumbs for even better texture.
- Make it gluten-free by using gluten-free flour and breadcrumbs.


Chicken Romano Variations
- Spicy Chicken Romano: Add 1 teaspoon of crushed red pepper flakes to the breadcrumb mixture.
- Herbed Romano: Mix 1 tablespoon of chopped fresh basil or oregano into the cheese coating.
- Baked Chicken Romano: Place breaded chicken on a wire rack over a baking sheet and bake at 425°F for 20-25 minutes.
Required Equipment for Chicken Romano
- Large skillet (preferably nonstick or cast-iron)
- Meat mallet
- Mixing bowls and plates
- Tongs
- Instant-read thermometer
Storing Chicken Romano & Shelf Life
Leftover Chicken Romano should be cooled completely and stored in an airtight container in the refrigerator. It will keep for up to 3 days. For best results, reheat in a 350°F oven for 10-12 minutes to restore crispiness. Freezing is not recommended as the crust may become soggy.
Chicken Romano Pairings & Serving Recommendations
- Pair with a fresh arugula salad tossed in lemon vinaigrette for brightness and balance.
- Serve atop a plate of creamy linguine Alfredo or spaghetti marinara.
- Add a glass of crisp white wine like Pinot Grigio or Sauvignon Blanc for an elegant Italian-American meal.
Chicken Romano Pro Tips (For the Best Results)
- Pound chicken evenly so it cooks through without burning the crust.
- Don’t overcrowd the skillet; fry in batches for even crispiness (more skillet tips here).
- Let the cooked chicken rest for 2-3 minutes before slicing to retain juiciness.
Chicken Romano FAQ
- Can I use chicken thighs instead of breasts?
Yes, boneless skinless thighs work great, just adjust the cooking time for thickness. - Can I make Chicken Romano ahead?
You can bread the chicken ahead of time and refrigerate for up to 12 hours before frying. - What’s the difference between Chicken Romano and Chicken Parmesan?
Chicken Romano uses a cheese blend in the breading and typically isn’t topped with tomato sauce or mozzarella, making it lighter and crisper (read more here).
Prep Time: 15 minutes
Cook Time: 20 minutes
Total Time: 35 minutes
Yield: 4 servings


Ingredients
- 4 boneless, skinless chicken breasts
- 1 cup grated Romano cheese
- 1 cup Italian breadcrumbs
- 2 large eggs
- ½ cup all-purpose flour
- ¼ cup olive oil
- 2 tablespoons unsalted butter
- 2 tablespoons fresh lemon juice
- Salt and pepper to taste
- 2 tablespoons chopped fresh parsley (garnish)
Instructions
-
1Pound the chicken breasts to an even thickness. Season both sides with salt and pepper.
-
2Prepare three shallow bowls: one with flour, one with beaten eggs, and one combined Romano cheese and breadcrumbs.
-
3Dredge each chicken breast in flour, dip in eggs, then coat with the Romano cheese breadcrumb mixture.
-
4Heat olive oil and butter in a large skillet over medium heat. Add chicken breasts and cook 5-6 minutes per side until golden brown and cooked through.
-
5Remove chicken from skillet. Add lemon juice to the pan and stir, scraping up any browned bits. Spoon the sauce over cooked chicken.
-
6Garnish with fresh parsley and serve immediately.
Approximate Information for One Serving
Nutrition Disclaimers
Number of total servings shown is approximate. Actual number of servings will depend on your preferred portion sizes.
Nutritional values shown are general guidelines and reflect information for 1 serving using the ingredients listed, not including any optional ingredients. Actual macros may vary slightly depending on specific brands and types of ingredients used.
To determine the weight of one serving, prepare the recipe as instructed. Weigh the finished recipe, then divide the weight of the finished recipe (not including the weight of the container the food is in) by the desired number of servings. Result will be the weight of one serving.
Did you make this recipe?
Please consider Pinning it!!