
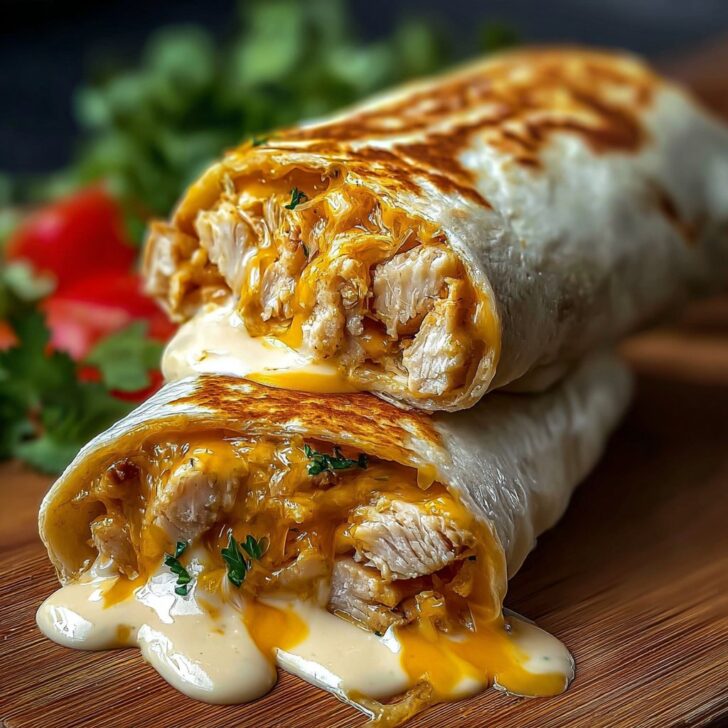

Hey y'all! If you're searching for a quick, flavor-packed, and utterly satisfying meal, this Cheesy chicken wrap is the answer. Tender, juicy chicken, gooey melted cheese, and crisp veggies all wrapped up in a soft tortilla—it's a delicious solution for lunch, dinner, or even a crowd-pleasing party snack. Whether you're feeding picky kids or need a grab-and-go meal, this cheesy chicken wrap delivers every time. Let's get cooking!
Why You'll Love This Cheesy Chicken Wrap
- Super quick and easy—perfect for busy weeknights or meal prep lunches.
- Loaded with cheesy, savory goodness and a satisfying blend of textures.
- Fully customizable to match your favorite preferences and flavors.
- Kid-friendly, portable, and mess-free for meals on-the-go.
- Balanced with protein, veggies, and fiber all in one tasty handheld wrap.
Cheesy Chicken Wrap Ingredients
- 2 large flour tortillas (10-inch size)
- 1 cup cooked chicken breast, shredded or sliced
- 1 cup shredded cheddar cheese (or Mexican blend cheese)
- ½ cup shredded lettuce
- 1 small tomato, diced
- ¼ cup sliced red onion
- ¼ cup sliced jalapeños (optional, for a kick)
- 2 tablespoons mayonnaise
- 1 tablespoon sour cream
- 1 teaspoon taco seasoning (or your favorite blend)
- 1 teaspoon olive oil or butter (for pan-grilling)
- Salt and pepper to taste
How to Make a Cheesy Chicken Wrap
Step 1: Prep Ingredients
- Shred or slice the cooked chicken. Dice the tomato, slice onion and jalapeños, and shred lettuce if not already done.
- In a small bowl, mix mayonnaise, sour cream, and taco seasoning. Set aside.
Step 2: Assemble the Cheesy Chicken Wrap
- Lay one tortilla flat on a clean surface. Spread half the mayo mixture in the center.
- Add ½ cup of chicken, ½ cup cheese, a handful of lettuce, tomato, onion, and jalapeños over the sauce.
- Season lightly with salt and pepper.
- Fold in the sides, then roll up tightly from the bottom. Repeat with the second wrap.
Step 3: Toast the Wraps
- Heat a nonstick skillet with 1 teaspoon olive oil or butter over medium heat.
- Place the wraps seam side down and cook for 2-3 minutes per side, until crispy and the cheese is melty.
- Slice in half and serve while warm.


Cheesy Chicken Wrap Notes & Cooking Tips
- For the juiciest results, use rotisserie or leftover grilled chicken (see how to prep rotisserie chicken).
- Swap in Greek yogurt for the sour cream for a lighter option.
- If prepping in advance, keep wraps un-toasted and grill just before serving for best texture.
Cheesy Chicken Wrap Variations
- Buffalo Style: Toss chicken in buffalo sauce and use blue cheese crumbles.
- BBQ Cheddar: Mix chicken with BBQ sauce and swap in Monterey Jack cheese.
- Low-Carb Wrap: Use a low-carb tortilla or large lettuce leaves instead.
Required Equipment for Cheesy Chicken Wraps
- Nonstick skillet or grill pan
- Sharp knife
- Cutting board
- Bowl for mixing sauce
Cheesy Chicken Wrap Storage & Shelf Life
Wrap cooled, un-toasted cheesy chicken wraps tightly in plastic wrap or foil and refrigerate for up to 3 days. For best flavor and safety, reheat on the skillet until warmed through and cheese is melted before serving. Avoid microwaving to prevent soggy tortillas (more info on food storage safety).
Cheesy Chicken Wrap Serving Suggestions
- Pair with homemade sweet potato fries or crispy baked chips.
- Serve alongside a fresh garden salad or coleslaw for a balanced meal.
- Enjoy with a cool glass of iced tea, lemonade, or your favorite soda.
Pro Tips for the Best Cheesy Chicken Wrap
- Warming tortillas briefly in the microwave makes them easier to fold and less likely to tear (learn proper wrap folding techniques).
- Use freshly grated cheese for extra meltiness and better flavor.
- Don’t overstuff—this keeps your wraps neat and easy to toast.
Cheesy Chicken Wrap FAQ
- Can I use other types of cheese?
Absolutely! Try mozzarella, pepper jack, or Swiss for different flavor profiles. - Can I make these wraps ahead of time?
Yes, assemble and refrigerate un-toasted wraps for up to 3 days, then toast just before eating for the best texture. - Is this recipe freezer-friendly?
While possible, freezing may affect texture. For best results, enjoy within 3 days of making.
Prep Time: 10 minutes
Cook Time: 6 minutes
Total Time: 16 minutes
Serves: 2 wraps


Ingredients
- 2 cups cooked chicken breast, shredded
- 1 cup shredded cheddar cheese
- 4 large flour tortillas
- ½ cup diced tomatoes
- ¼ cup sliced green onions
- ½ cup shredded lettuce
- ¼ cup ranch or mayonnaise
- 1 tablespoon olive oil
- Salt and pepper, to taste
Instructions
-
1In a large bowl, combine the shredded chicken, cheddar cheese, diced tomatoes, green onions, and ranch or mayonnaise. Mix until well coated.
-
2Lay out the flour tortillas on a clean surface. Divide the chicken mixture evenly among the tortillas.
-
3Top each with shredded lettuce and season with salt and pepper to taste.
-
4Fold in the sides of each tortilla and roll up tightly to form wraps.
-
5Heat olive oil in a large skillet over medium heat. Add the wraps seam-side down and cook for 2-3 minutes per side until golden brown and the cheese has melted.
-
6Slice in half and serve warm.
Approximate Information for One Serving
Nutrition Disclaimers
Number of total servings shown is approximate. Actual number of servings will depend on your preferred portion sizes.
Nutritional values shown are general guidelines and reflect information for 1 serving using the ingredients listed, not including any optional ingredients. Actual macros may vary slightly depending on specific brands and types of ingredients used.
To determine the weight of one serving, prepare the recipe as instructed. Weigh the finished recipe, then divide the weight of the finished recipe (not including the weight of the container the food is in) by the desired number of servings. Result will be the weight of one serving.
Did you make this recipe?
Please consider Pinning it!!