
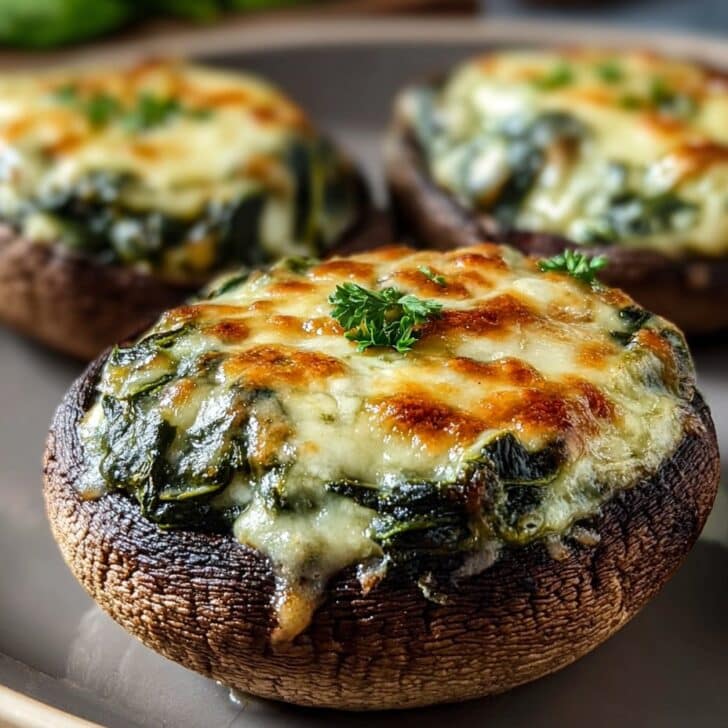
My Love Letter to Stuffed Portobello Mushrooms (with a Spinach and Cheese Hug)
So you know how every once in awhile, you stumble on a dinner recipe that’s ridiculously easy but somehow gets you to feel like a real chef? This Spinach and Cheese Stuffed Portobello Mushroom happens to be mine. The first time I made it, I actually misread the oven temp and burned the edges (the smell still haunts me), but everyone still ate it and asked for more. Now it’s become my lazy evening hero—especially after one of those days that just feels three Mondays rolled into one.
And, not to get too philosophical over fungi, but there’s something oddly satisfying about eating dinner out of a mushroom cap. Is it practical? Not always. Is it fun? Absolutely. Dash of garlic, handful of cheese, and my old friend spinach—what’s not to love there?
Why This is a Go-To in My House
I make this recipe when I want something comforting but don’t have the brainpower for a five-step sauce. My family goes wild for this mainly because it’s basically cheesy spinach dip you can eat for dinner (don’t tell them I said that). Also, fewer pans to wash—tiny victory! Oh, and if you’re worried about the mushrooms going a bit soggy, trust me, it happens, but no one ever seems to care (a little mess is part of the magic, I think). I once tried making this when I was out of spinach and had to improvise with kale; not bad, but definitely gives off more of a health-food café vibe—spinach is easier on the jaws.
What You’ll Need (And a Few Shortcuts)
- 4 large portobello mushroom caps (I just grab whatever looks biggest at the shop—sometimes they’re smaller, and then I make six instead of four, math is flexible)
- 2 cups roughly chopped fresh spinach (frozen spinach absolutely works, just squeeze the life out of it first—I mean, the water, not its hopes and dreams)
- 3/4 cup ricotta cheese (cottage cheese will work in a pinch, thanks Mom for the tip)
- 1/3 cup shredded mozzarella cheese (cheddar or Swiss both have their moments too, don’t they?)
- 2 tablespoons grated Parmesan (the decent stuff, or from that classic green can, no judgment)
- 2 large garlic cloves, minced (I sometimes double this because garlic doesn’t count as an ingredient so much as a personality trait)
- 2 tablespoons olive oil (I’ll use whatever oil is around if I’m nearly out)
- 1/2 teaspoon salt (or just a smidge, to taste)
- Pepper, a few generous twists
- 1/4 teaspoon dried oregano (or Italian seasoning—does anyone actually measure dried oregano? I sure don’t)
- Optional: red pepper flakes for a sneaky kick
How I Pull This Together (The Real-Life Edition)
1. Set your oven to 400°F (200°C). I forget to preheat at least half the time and then just let the mushrooms hang out a little longer on the baking tray—no disaster yet.
2. Wipe the mushrooms with a damp paper towel and gently twist out the stems (save them for soup, or feed them to your dog if you’ve got one weird like mine who eats veg). Lay ‘em gill side up on a lined baking tray. Brush with olive oil and scatter on some salt and pepper.
3. Pop those caps into the oven for about 8-10 minutes just to soften up a bit—don’t skip this. Trust me, stuffing raw mushrooms is like trying to fill leaky boats; I learned the hard way.
4. Meanwhile, in a frying pan, add a splash of oil and toss in your garlic. Once it smells amazing (about a minute), add the spinach and cook until it wilts down and looks a bit tired (takes just a couple minutes). Sometimes I get impatient and turn up the heat, but gentle is better.
5. Transfer the spinach to a bowl (if there’s liquid, I sort of squish it out with a fork—works fine) and mix in the ricotta, mozzarella, Parmesan, oregano, salt and some more pepper. Stir until it’s mostly blended—this is where I usually sneak a taste or two. For science.
6. Remove your mushroom caps from the oven, let them cool for a moment so you don’t burn your fingers (again, learned that one…), and spoon the cheesy spinach mixture equally into each.
7. Sprinkle on a little extra mozzarella or Parmesan if you feel the urge. I usually do, even though I say I won’t.
8. Back they go into the oven for another 15 minutes or until they’re bubbly and golden around the edges—don’t worry if the filling oozes out a bit.
9. Let them cool for a few minutes before serving, unless you like the feeling of molten cheese on your tongue (which I kind of do).
What I’ve Learned (Sometimes the Hard Way)
- If you wash the mushrooms too much, they get soggy—just a quick wipe is plenty (seriously, my first batch was like eating damp slippers).
- Skipping that pre-bake step? The filling sometimes just runs right through.
- I find it tastes even better the next day, fridge-cold or warmed back up—though that does lead to a heated debate in my house: cold or hot leftovers?
Other Ways I’ve Tried (Not All Were Winners…)
- I’ve stuffed these with feta and sun-dried tomatoes (delish) and tried swapping spinach with arugula one time (eh, too peppery for me but someone may like it).
- Tried adding artichoke hearts once; ended up mushier than I expected. Not a train wreck, just a little ‘off’.
- Even roasted a handful of cherry tomatoes in with the mushrooms—looked pretty, tasted sweet.
Tools I Use (And Some You Really Don’t Need)
- Tray or baking dish (I usually just use an old rimmed cookie sheet, works fine)
- Mixing bowl (any size, sometimes I use a saucepan if the bowls are all dirty)
- Frying pan for spinach (but you can wilt the greens in the microwave if you’re in a hurry—no one will report you to the culinary police)
- Basting brush (but I’ll use my fingers in a pinch, why complicate things?)

How to Store (Or Not!)
I pop leftovers into a covered dish in the fridge. They’ll last a couple days but honestly, in my house it never survives past breakfast the next day—someone always swipes it. If you *do* get to keep them overnight, I would rewarm gently in the oven or microwave, but don’t expect that crispy top to hold on for dear life.
How to Serve (A Few Personal Picks)
These are great with a simple salad (like the one over at Serious Eats) and sometimes, if I’m feeling extra, with a slice of sourdough. Occasionally, I put a fried egg on top for brunch vibes—my aunt calls this “breakfast for dinner” and it’s oddly spectacular. It also goes really well with a garlicky yogurt sauce—more garlic! Here’s one I loosely follow: Bon Appétit Yogurt Sauce.
Things I Learned the Hard Way (AKA: My Pro Tips)
- Letting the mushrooms cool down a bit before stuffing really is worth the wait; I once tried to rush it and basically just chased hot cheese across my counter. Not fun.
- Don’t overload the caps; they look nicer piled high but then you end up with a lava flow of cheese in the oven (not the worst thing, but makes the cleanup irksome).
- Always taste the filling before you bake it. I almost always forget, but one day I realized mid-bake I left out the salt—no bueno!
Real-World FAQ (A Few I’ve Actually Been Asked, Honest)
Can I make these ahead of time?
Yep! Assemble everything and refrigerate (uncooked) up to a day. You may need to bake a tad longer if cold from the fridge—just keep an eye (or rather, a nose) out for the cheesy aroma.
Do I have to use ricotta?
Not at all—cottage cheese works, cream cheese isn’t half bad either. Even vegan cheese, if that’s your thing; it sort of melts.
What if my mushrooms are super tiny?
Honestly, just make more of them. Or serve as an appetizer instead of dinner. Or both, I won’t tell.
Can I grill these instead?
Absolutely—just use a grill pan or actual BBQ (though I lost one through the grill once—so maybe still use foil or a tray).
Are there any must-have extras?
Well, I never say no to a bit more garlic bread on the side—or maybe a sprinkle of fresh parsley if I’m feeling fancy. And a dash of hot sauce wakes the whole thing up.
(And if you’re curious about mushrooms themselves, the Mushroom Council folk have some fun info and quirky facts, worth a peek!)
Small note – these little flavor boats are really as adaptable as it gets, so don’t stress the details. And hey, if you come up with your own twist, I’d love to hear it… unless it involves raisins. Then just keep that to yourself (kidding… sort of).

Ingredients
- 4 large portobello mushroom caps, stems and gills removed
- 2 cups fresh spinach, chopped
- 1/2 cup ricotta cheese
- 1/2 cup shredded mozzarella cheese
- 1/4 cup grated Parmesan cheese
- 2 cloves garlic, minced
- 1 tablespoon olive oil
- 1/4 teaspoon crushed red pepper flakes (optional)
- Salt and black pepper to taste
- Fresh parsley, chopped for garnish
Instructions
-
1Preheat the oven to 400°F (200°C). Line a baking sheet with parchment paper or lightly grease it.
-
2Brush the portobello mushroom caps with olive oil and place them gill side up on the prepared baking sheet. Season with salt and black pepper.
-
3Heat a skillet over medium heat, add the remaining olive oil and garlic. Sauté for 1 minute, then add the chopped spinach. Cook until wilted, about 2-3 minutes.
-
4Remove the skillet from heat and stir in ricotta cheese, half of the mozzarella, Parmesan cheese, red pepper flakes, salt, and black pepper.
-
5Divide the spinach and cheese mixture evenly among the mushroom caps and top each with the remaining mozzarella.
-
6Bake for 20-25 minutes, until the mushrooms are tender and the cheese is golden and bubbly. Garnish with fresh parsley before serving.
Approximate Information for One Serving
Nutrition Disclaimers
Number of total servings shown is approximate. Actual number of servings will depend on your preferred portion sizes.
Nutritional values shown are general guidelines and reflect information for 1 serving using the ingredients listed, not including any optional ingredients. Actual macros may vary slightly depending on specific brands and types of ingredients used.
To determine the weight of one serving, prepare the recipe as instructed. Weigh the finished recipe, then divide the weight of the finished recipe (not including the weight of the container the food is in) by the desired number of servings. Result will be the weight of one serving.
Did you make this recipe?
Please consider Pinning it!!