
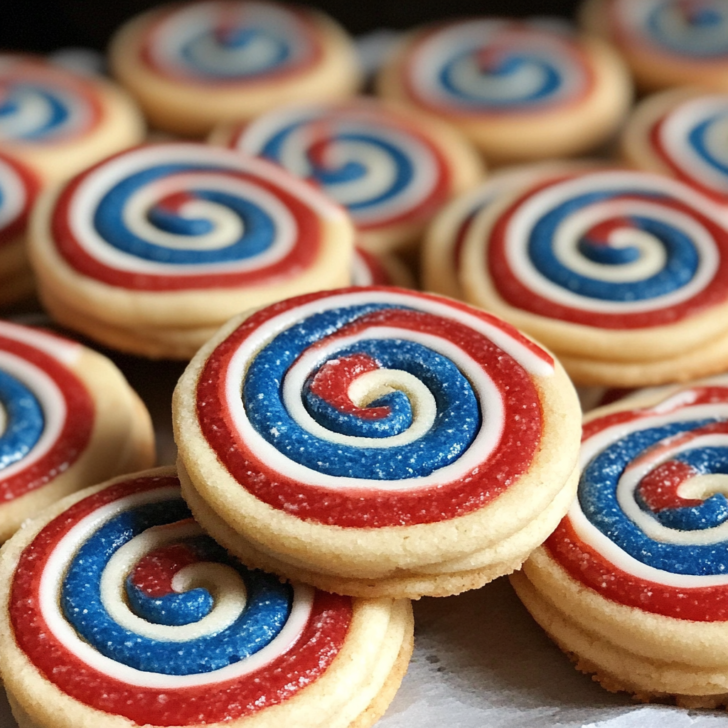
When summer celebrations are in full swing and your dessert table needs a show-stopping treat, Red, White and Blue Pinwheel Icebox Cookies deliver flair and flavor in every swirl. These colorful, buttery cookies not only taste fantastic, but they also add a festive punch to any 4th of July, Memorial Day, or Labor Day spread.
Made from a simple sugar cookie dough that’s tinted, layered, rolled, and sliced, these pinwheel cookies offer vibrant patriotic hues with a tender, shortbread-like texture. Best of all? You can make the dough in advance, freeze it, and slice off cookies as needed—making them a stress-free option for busy hosts.
Let’s break down everything you need to know to master these eye-catching cookies.
Why You'll Love These Pinwheel Icebox Cookies
Whether you’re a seasoned baker or a beginner, this recipe has something for everyone:
- Visually striking: The red, white, and blue swirl is guaranteed to stand out.
- Make-ahead friendly: Store dough logs in the freezer and bake when needed.
- Customizable: Use different colors for different occasions or flavor extracts.
- No cookie cutters needed: Just slice and bake.
- Perfect for gifting: Stack them in jars or wrap in cellophane for easy party favors.
These cookies are a patriotic twist on a nostalgic favorite—and they never fail to impress.
Exact Ingredients with Measurements
This recipe yields about 36 cookies, depending on how thinly you slice them.
For the Cookie Dough:
- 2 ½ cups (315g) all-purpose flour
- ½ teaspoon baking powder
- ½ teaspoon fine salt
- 1 cup (226g) unsalted butter, softened
- 1 cup (200g) granulated sugar
- 1 large egg
- 1 teaspoon vanilla extract
- Red gel food coloring
- Blue gel food coloring
Optional for Decorating:
- Sanding sugar or sprinkles for rolling edges
- Clear sanding sugar for sparkle
- White chocolate drizzle or glaze (post-bake)
Tools You’ll Need
- Stand mixer or hand mixer
- Mixing bowls
- Measuring cups and spoons
- Food-safe gloves (to avoid food coloring stains)
- Rolling pin
- Parchment paper or plastic wrap
- Sharp knife or serrated blade
- Baking sheets
- Cooling rack
Step-by-Step Instructions
Step 1: Make the Base Dough
In a medium bowl, whisk together the flour, baking powder, and salt. Set aside.
In a large bowl or stand mixer, beat the butter and sugar together until pale and fluffy—about 2–3 minutes. Add in the egg and vanilla extract, beating until combined.
Gradually mix in the dry ingredients until a soft dough forms. Do not overmix.
Step 2: Divide and Tint
Divide the dough into three equal parts.
- Leave one third plain (white).
- Mix red gel coloring into the second piece.
- Mix blue gel coloring into the third.
Use food-safe gloves or mix each portion separately to avoid blending colors. Wrap each section in plastic and refrigerate for 30–45 minutes to firm up slightly for rolling.
Step 3: Roll and Layer
On a piece of parchment paper, roll out the blue dough into a rectangle approximately 9x12 inches.
Repeat with the white dough and then the red. Try to keep them similar in size.
Carefully stack the layers: blue on the bottom, white in the middle, red on top. Lightly press to adhere, then trim the edges for neatness.
Step 4: Roll into a Log
Using the parchment paper to help, tightly roll the layered dough into a log, starting from the long edge. Chill the log wrapped in parchment or plastic for at least 2 hours, or freeze for up to 3 months.
Optional: Roll the outside of the log in sanding sugar or sprinkles for added texture and sparkle.
Step 5: Slice and Bake
Preheat oven to 350°F (175°C) and line baking sheets with parchment.
Slice chilled dough into ¼-inch rounds and space them 2 inches apart on the sheet.
Bake for 9–11 minutes, or until the edges are just barely golden. Let cool on the pan for 5 minutes before transferring to a cooling rack.
Make-Ahead & Storage Tips


- Dough logs: Store wrapped in plastic for up to 3 days in the fridge or 3 months in the freezer.
- Sliced cookies: Freeze slices between parchment layers in a container. Bake directly from frozen—add 1 extra minute.
- Baked cookies: Store in an airtight container at room temperature for up to 1 week. They hold up well for shipping, too.
Variations and Flavor Twists
- Flavor Extracts: Swap vanilla for almond, lemon, or peppermint.
- Marble Effect: Instead of stacking, swirl the colored doughs together.
- Rainbow Swirls: Use 5–6 colors for a playful, all-season version.
- Chocolate Dough: Replace ¼ cup flour with cocoa powder for contrast.
Decorating Ideas
After baking, drizzle cooled cookies with:
- White chocolate glaze
- Royal icing outlines
- Edible glitter dust
- Patriotic confetti sprinkles
Or keep them simple—the swirl does most of the visual heavy lifting!
Troubleshooting Common Issues
Cookies spread too much
→ Dough wasn’t chilled enough. Always chill before slicing.
Color bleed in layers
→ Use gel food coloring—not liquid—and handle gently.
Dry or crumbly texture
→ Measure flour accurately. Spoon and level; don’t scoop.
Edges too rough
→ Try smoothing the log slightly before chilling. Use a sharp serrated knife to slice.
Nutritional Information (Per Cookie)
- Calories: 130
- Fat: 6g
- Carbohydrates: 17g
- Sugar: 8g
- Protein: 1g
FAQs
Q: Can I use liquid food coloring?
A: It’s not recommended. Liquid colors can make the dough too soft. Use gel or paste for vibrant color without affecting texture.
Q: Can I make the dough ahead of time?
A: Absolutely. Store wrapped dough in the fridge for 3 days or freeze for up to 3 months.
Q: What’s the best way to keep the layers neat?
A: Trim the edges after rolling each layer, and use a ruler or guide to maintain uniform size.
Q: Can I use gluten-free flour?
A: Yes, use a 1:1 gluten-free baking blend. Chill the dough slightly longer before rolling.
Q: How do I get the swirls tight and even?
A: Roll slowly and tightly with even pressure. Chill well before slicing for clean edges.
Final Thoughts
Red, White and Blue Pinwheel Icebox Cookies are the perfect intersection of beauty, convenience, and flavor. With their festive spiral and buttery crumb, they make a dazzling addition to any patriotic celebration. What makes them even better is the ability to prepare ahead, freeze, and bake just in time for the fireworks.
Add these cookies to your summer baking lineup and you’ll not only impress your guests but also save time and stress in the kitchen. They’re the kind of treat that makes memories—and looks good doing it.