

Hey y'all! Looking for a dessert that tastes like a tropical vacation? This Pineapple Coconut Ice Cream Cake is bursting with creamy coconut, sweet-tart pineapple, and a crunchy cookie crust—absolute perfection for summer parties, birthdays, or just because. It's cool, refreshing, and sure to wow your friends and family. Let's get cooking!
Why You'll Love This Pineapple Coconut Ice Cream Cake
- Easy, no-bake recipe that comes together in under 30 minutes of hands-on time.
- Creamy, dreamy texture with bursts of juicy pineapple and toasted coconut in every bite.
- Perfect for making ahead and serving at cookouts, potlucks, or birthday parties.
- Customizable with your favorite ice cream flavors or add-ins.
- Refreshing, fruity, and not too sweet—ideal for hot days!
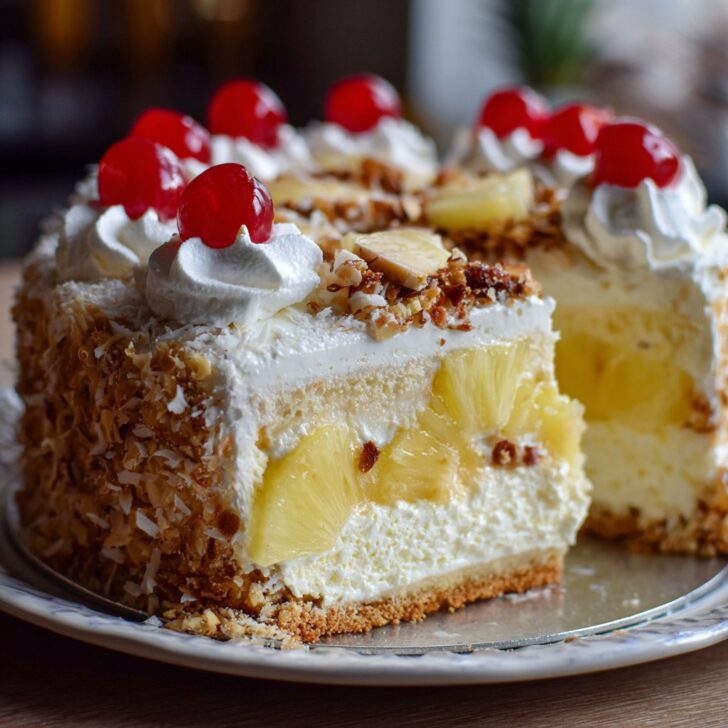
Pineapple Coconut Ice Cream Cake Ingredients
- 2 cups graham cracker crumbs
- ½ cup unsalted butter, melted
- ½ cup sweetened shredded coconut, lightly toasted
- 1.5 quarts coconut ice cream (about 6 cups), slightly softened
- 1.5 cups crushed pineapple, well-drained
- 1 cup whipped topping (plus more for serving, optional)
- ⅓ cup chopped macadamia nuts (optional)
- Extra toasted coconut, for garnish
- Pineapple chunks or cherries, for garnish
How to Make Pineapple Coconut Ice Cream Cake
Step 1: Prepare the Crust
In a medium bowl, combine graham cracker crumbs, melted butter, and ¼ cup toasted coconut. Stir until the mixture resembles wet sand. Press evenly into the bottom of a 9-inch springform pan. Place in the freezer for 10 minutes to set.
Step 2: Layer the Ice Cream
Spread half of the softened coconut ice cream over the chilled crust. Sprinkle half the drained pineapple and half the macadamia nuts (if using) evenly on top. Gently swirl with a spatula to slightly combine. Freeze for 10 minutes.
Step 3: Add More Layers
Spread the remaining coconut ice cream over the first layer. Top with the rest of the pineapple and macadamia nuts. Swirl again if desired. Cover and freeze for at least 4 hours, or until firm.
Step 4: Garnish & Serve
Before serving, remove the cake from the pan. Top with whipped topping, extra toasted coconut, and pineapple chunks or cherries. Slice with a warm knife for easy serving. Enjoy your Pineapple Coconut Ice Cream Cake!
Notes for the Perfect Pineapple Coconut Ice Cream Cake
- Let your ice cream soften at room temperature for 10–15 minutes to make spreading easy.
- Drain pineapple thoroughly to prevent a soggy crust; you can press it gently with paper towels.
- For more on toasting coconut, check out this guide from Simply Recipes.


Variations on Pineapple Coconut Ice Cream Cake
- Chocolate Chip Twist: Sprinkle mini chocolate chips between layers for extra decadence.
- Dairy-Free Version: Use vegan coconut ice cream and plant-based whipped topping.
- Tropical Fruit Medley: Add diced mango or papaya along with the pineapple for a fruitier flavor.
Required Equipment for Pineapple Coconut Ice Cream Cake
- 9-inch springform pan
- Mixing bowls
- Rubber spatula
- Measuring cups and spoons
- Hand mixer or whisk (for whipped topping, optional)
Storage Instructions for Pineapple Coconut Ice Cream Cake
Cover leftover cake tightly with plastic wrap or foil and store in the freezer for up to 2 weeks. For best texture, let slices sit at room temperature for 5–8 minutes before serving.
Pineapple Coconut Ice Cream Cake Pairings & Serving Suggestions
- Serve slices with fresh berries, mango, or a drizzle of caramel sauce.
- Pair with iced coffee, piña coladas, or sparkling water for a refreshing treat.
- Top with extra macadamia nuts or a sprinkle of sea salt for crunch.
Pro Tips for the Best Pineapple Coconut Ice Cream Cake
- Use a hot knife (run under hot water, then wipe dry) to slice cleanly through the frozen cake.
- Make sure your crust is well-pressed and chilled before layering to prevent crumbling.
- For more ice cream cake tips, check out this Food Network guide.
Pineapple Coconut Ice Cream Cake FAQ
- Can I make this Pineapple Coconut Ice Cream Cake ahead of time?
- Absolutely! It’s best made a day in advance so it has time to freeze completely and flavors can meld.
- Can I use fresh pineapple instead of canned?
- Yes, just be sure to chop it finely and drain it well to avoid excess moisture.
- What if I don’t have a springform pan?
- You can use a regular 9-inch cake pan lined with parchment, but a springform makes unmolding much easier.
For more nutritional information about coconut and pineapple, visit the Nutrition Value website.
Prep Time: 25 minutes
Cook Time: 0 minutes (plus freezing)
Total Time: 4 hours 25 minutes
Serves: 10-12
Ingredients
- 2 cups crushed graham crackers
- ½ cup unsalted butter, melted
- 1.5 quarts coconut ice cream, slightly softened
- 1.5 cups crushed pineapple, drained
- 1 cup sweetened shredded coconut
- ½ cup chopped macadamia nuts (optional)
- ¼ cup granulated sugar
- Whipped cream, for topping
Instructions
-
1In a medium bowl, combine crushed graham crackers, melted butter, and granulated sugar. Mix until well combined.
-
2Press the mixture firmly into the bottom of a 9-inch springform pan to form the crust. Freeze for 15 minutes.
-
3Spread half of the softened coconut ice cream evenly over the chilled crust. Sprinkle with half of the crushed pineapple and half of the shredded coconut.
-
4Add the remaining coconut ice cream on top, smoothing the surface. Top with the rest of the pineapple, shredded coconut, and chopped macadamia nuts if using.
-
5Cover the cake with plastic wrap and freeze for at least 6 hours or until firm.
-
6Before serving, remove the cake from the pan and let it sit at room temperature for 5-10 minutes. Garnish with whipped cream if desired, slice, and serve.
Approximate Information for One Serving
Nutrition Disclaimers
Number of total servings shown is approximate. Actual number of servings will depend on your preferred portion sizes.
Nutritional values shown are general guidelines and reflect information for 1 serving using the ingredients listed, not including any optional ingredients. Actual macros may vary slightly depending on specific brands and types of ingredients used.
To determine the weight of one serving, prepare the recipe as instructed. Weigh the finished recipe, then divide the weight of the finished recipe (not including the weight of the container the food is in) by the desired number of servings. Result will be the weight of one serving.
Did you make this recipe?
Please consider Pinning it!!