

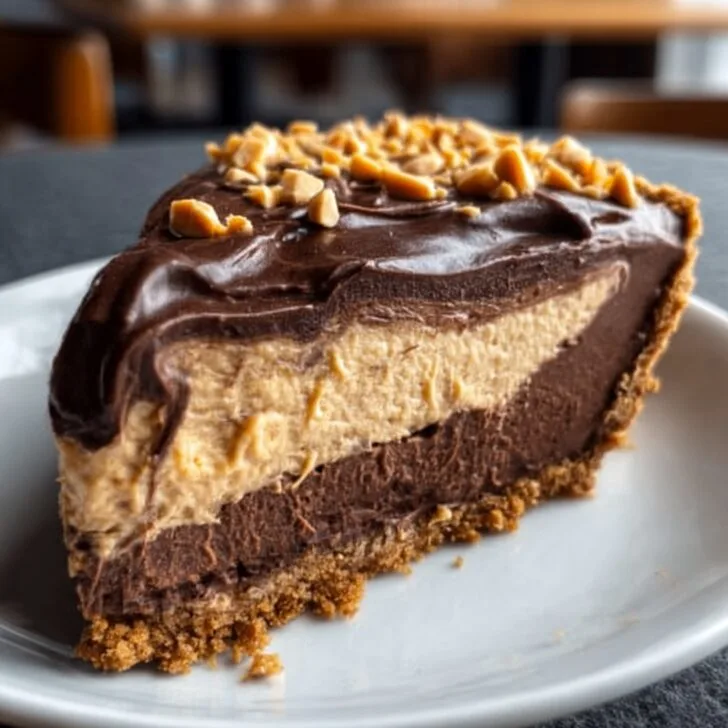
Hey y'all! If you're craving a totally irresistible, super-easy dessert that'll wow at any get-together, this No-Bake Chocolate Peanut Butter Pie is about to become your new favorite treat. Imagine layers of creamy peanut butter, rich chocolate, and a graham cracker crust—all without turning on the oven! Perfect for summer parties, holidays, or just satisfying a sweet tooth, this pie is both luscious and simple to whip up. Let’s get cooking!
Why You'll Love This No-Bake Chocolate Peanut Butter Pie
- Quick and easy—just 20 minutes of prep, no baking required!
- Incredibly creamy texture with the perfect balance of sweet and salty.
- Can be made ahead and is ideal for potlucks or celebrations.
- Uses simple supermarket ingredients—nothing fancy needed!
- Totally customizable with your favorite toppings and crust options.
No-Bake Chocolate Peanut Butter Pie Ingredients
- 1 ½ cups chocolate graham cracker crumbs (about 10 sheets)
- ⅓ cup unsalted butter, melted
- 8 oz cream cheese, softened
- 1 cup creamy peanut butter
- 1 cup powdered sugar
- 1 teaspoon vanilla extract
- 1 ¼ cups heavy whipping cream (divided)
- 1 cup semi-sweet chocolate chips
- Pinch of salt
- Optional toppings: whipped cream, peanut butter cups, chopped peanuts, chocolate shavings
How to Make No-Bake Chocolate Peanut Butter Pie
Step 1: Prepare the Chocolate Crust
- In a medium bowl, mix the chocolate graham cracker crumbs and melted butter until fully combined and the texture resembles wet sand.
- Press the mixture firmly and evenly into the bottom and sides of a 9-inch pie pan.
- Chill in the refrigerator for 15 minutes while preparing the filling.
Step 2: Whip Up the Peanut Butter Filling
- With a handheld or stand mixer, beat the softened cream cheese until smooth.
- Add peanut butter, powdered sugar, vanilla, and a pinch of salt. Beat again until creamy and well blended.
- In a separate bowl, whip 1 cup heavy cream to stiff peaks with a mixer (about 3-4 minutes).
- Gently fold the whipped cream into the peanut butter mixture until smooth.
- Spoon the filling into your prepared crust and smooth the top with a spatula.
Step 3: Add the Chocolate Ganache Topping
- In a microwave-safe bowl, heat remaining ¼ cup heavy whipping cream for 20-30 seconds until hot (but not boiling).
- Pour over the chocolate chips, let sit for 1 minute, then stir until smooth and shiny.
- Spread the ganache evenly over the pie filling.
Step 4: Chill and Serve Your No-Bake Chocolate Peanut Butter Pie
- Refrigerate the pie for at least 4 hours (overnight is best) to allow it to set.
- Top with whipped cream, peanut butter cups, or chopped peanuts if you like before slicing and serving.
Notes for Perfect No-Bake Chocolate Peanut Butter Pie
- For a gluten-free option, use gluten-free chocolate cookies or graham crackers—read more about gluten-free eating here.
- Make sure cream cheese is room temperature to ensure the filling is lump-free.
- If you love darker chocolate, swap in dark chocolate chips for a richer ganache—learn about chocolate types at Cooking Light.


Variations: Fun Twists on No-Bake Chocolate Peanut Butter Pie
- Oreo Crust: Swap graham crackers for crushed Oreos for an extra chocolatey base.
- Vegan Version: Use dairy-free cream cheese, coconut whipped topping, and plant-based butter.
- Nut-Free: Replace peanut butter with sunflower seed butter or cookie butter for those with allergies.
Required Equipment for No-Bake Chocolate Peanut Butter Pie
- 9-inch pie pan
- Electric mixer (hand or stand)
- Mixing bowls
- Rubber spatula
- Measuring cups and spoons
Storage and Shelf Life
Store your No-Bake Chocolate Peanut Butter Pie tightly covered in the fridge for up to 5 days. For longer storage, cut into slices and freeze sealed for up to 2 months, thawing overnight before serving for best texture.
Suggested Pairings and Serving Ideas
- Serve chilled with a dollop of whipped cream for a retro diner vibe.
- Pair each slice with fresh strawberries or raspberries to balance the richness.
- Enjoy with a glass of cold milk or a hot cup of coffee for the perfect ending to a meal.
Pro Tips for the Best No-Bake Chocolate Peanut Butter Pie
- Chill your mixing bowl before whipping cream for extra stability—read this whipped cream guide.
- For super clean slices, dip your knife in hot water and wipe dry between cuts.
- Add a pinch of flaky sea salt on top for spectacular flavor contrast.
No-Bake Chocolate Peanut Butter Pie FAQ
- Can I make No-Bake Chocolate Peanut Butter Pie ahead of time?
- Absolutely! You can prepare it up to 24 hours in advance; just keep it refrigerated until ready to serve.
- What if I don't have heavy whipping cream?
- You can substitute an equal amount of whipped topping like Cool Whip, though the pie may be slightly lighter in texture.
- Can I use crunchy peanut butter instead of creamy?
- Yes! Crunchy peanut butter adds a bit of texture and extra peanutty flavor—just make sure it’s well mixed.
Prep Time: 20 minutes
Total Time: 4 hours 20 minutes (including chilling)
Servings: 8 slices


Ingredients
- 24 Oreo cookies, crushed
- 6 tablespoons unsalted butter, melted
- 1 cup creamy peanut butter
- 8 ounces cream cheese, softened
- 1 cup powdered sugar
- 1 teaspoon vanilla extract
- 1 ½ cups whipped topping, plus extra for garnish
- ½ cup semi-sweet chocolate chips, melted
Instructions
-
1In a medium bowl, combine crushed Oreo cookies and melted butter. Mix until well combined, then press the mixture firmly into the bottom and sides of a 9-inch pie dish to create the crust.
-
2In a large bowl, beat together peanut butter, cream cheese, powdered sugar, and vanilla extract until smooth and creamy.
-
3Fold in the whipped topping until the mixture is light and fluffy.
-
4Spread the peanut butter filling evenly over the prepared Oreo crust.
-
5Drizzle the melted chocolate over the top of the pie. Garnish with additional whipped topping if desired.
-
6Refrigerate the pie for at least 4 hours, or until set, before slicing and serving.
Approximate Information for One Serving
Nutrition Disclaimers
Number of total servings shown is approximate. Actual number of servings will depend on your preferred portion sizes.
Nutritional values shown are general guidelines and reflect information for 1 serving using the ingredients listed, not including any optional ingredients. Actual macros may vary slightly depending on specific brands and types of ingredients used.
To determine the weight of one serving, prepare the recipe as instructed. Weigh the finished recipe, then divide the weight of the finished recipe (not including the weight of the container the food is in) by the desired number of servings. Result will be the weight of one serving.
Did you make this recipe?
Please consider Pinning it!!