

Cozy Up With This Apple and Cranberry Grilled Cheese
Alright, first off—if you've never tried putting fruit in grilled cheese, don't skip this one. Seriously. I was suspicious the first time, too. But back in college (don’t ask what year, please!) I had this accidental genius moment after a late movie night—some leftover apples, a random bag of cranberries, and what was probably too much cheese for one person. One experiment later, and honestly, I’ve been kinda obsessed ever since. My flatmate wandered in, took a bite, and said, “You did what with grilled cheese?” Now it’s a full-on autumn tradition. Confession: I sometimes make it in July because, well, who’s judging?
Why I Keep Coming Back To This Combo
I make this grilled cheese whenever I need a pick-me-up or when my family starts requesting “that awesome sweet-tart sandwich” (which is a surprising amount). It always disappears—which is both flattering but slightly annoying if you’re hoping for leftovers. The sweet apples mixed with tart cranberries and gooey cheese make it just unusual enough that people remember it. Plus, I'll be honest, it makes me feel a tiny bit fancy without needing any actual culinary skill. There was a time I tried making it for a brunch and burned half the batch—my kitchen smelled weird for days, but it was still worth it. So, if you hate mess or crave something just a tad different from ordinary grilled cheese, this’ll be your new comfort go-to. Or, it’ll give you something to talk about at your next potluck besides your neighbor’s endless potato salad obsession.
What You’ll Need (But Don't Stress the Details)
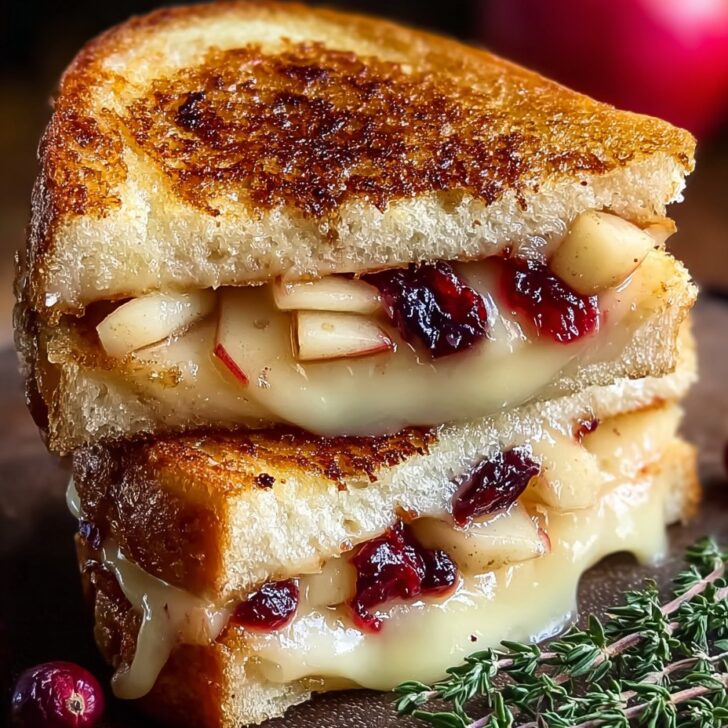
- 2 large slices of sturdy bread (I’m partial to sourdough, but honestly, I've grabbed plain sandwich bread when that's all I had. Rye is cracking, too.)
- ½ crisp apple, thinly sliced (Granny Smith for tartness, Fuji if you want it sweeter—my gran loved Royal Gala, so use what you’ve got)
- A small handful of dried cranberries (fresh are more tart, but dried are what I usually have in the pantry)
- 2-3 generous slices of sharp white cheddar (OK, I confess, sometimes I go rogue with brie or Gouda, and it’s still delicious)
- 1 tablespoon butter or olive oil (either one works; in a pinch, I've used mayo on the outside—Bon Appétit has thoughts on this)
- A sprinkle of cinnamon (optional; honestly, I forget about this half the time but it's always a nice surprise when I remember)
Let’s Get Cooking (Honestly, It’s Not That Fussy)
- First, gently butter one side of each bread slice. Don’t stress if it tears a bit—one day I just drizzled olive oil and it worked out fine.
- Lay a slice of bread, buttered side down, in a cold skillet. (This is where I like to layer cheese first; it acts kind of like tasty glue.)
- Shingle on your apple slices (I sometimes snack a few, but who’s counting), then scatter over the cranberries. Pile on your cheese (and don’t be shy—a little cheddar escape onto the pan actually gets crispy, which I could eat all by itself).
- If you’re feeling wild, dash on a pinch of cinnamon. Sandwich on your second bread slice, buttered side up.
- Turn the heat to medium-low (patience is key here—I once rushed it, and, well, blackened bread is not a flavor), and cook for about 3–4 minutes. Press down gently with a spatula; peek underneath. When it’s lovely and golden, carefully flip it.
- Cook the other side for another 2–3-ish minutes. If your cheese isn’t gooey yet, cover the pan for a mum, or pop a tablespoon of water in and put a lid on—my own lazy steamy method.
- Remove from heat, let it cool a minute (or not—I’ve burnt my tongue more than once), then slice with a big grin.
At this point, it’s much too tempting to eat as you go. I always do. That’s normal, right?
Bits I’ve Learned The Hard Way (Notes)
- Overloading with apple slices? It gets a bit soggy, but some people like that. Maybe keep it to a layer.
- If your cranberries are super dry, soaking them in warm water for a minute softens them up—who knew?
- And if your cheese tries to escape, just enjoy the crispy bits from the pan. Maybe next time use slightly thicker slices.
Variations I’ve Fiddled With (and a Flop)
- Tried it with brie once—super creamy, though a bit rich if you overdo it. Still, yum.
- I thought blue cheese would work, but, yikes, it totally overpowered everything else. Maybe your tastebuds are braver.
- Using raisin bread instead of plain bread is a wild card—oddly delightful, though sweeter than I’d pick for regular lunch.
What If I Don’t Have a Fancy Pan? (Equipment Chat)
I have a trusty nonstick skillet. That said—a cast iron pan does get you a more even crust, but hey, I used to make these on a dodgy electric griddle borrowed form a mate, and nobody complained. No panini press? Just press down with your spatula or a clean plate (if you like the slightly squished look).


Keeping It Fresh (Storage Stuff)
If you somehow have leftovers, wrap them in foil or pop ‘em in an airtight container in the fridge for a day or two. Reheat in a dry skillet to get back a bit of that crisp. But honestly, in my house it never lasts that long—I counted five minutes once before it was all gone. True story.
How I Like to Serve It (And a Family Quirk)
I love this grilled cheese cut into triangles—don’t ask why, it just feels right. My family’s tradition is to pair it with a big old bowl of tomato soup (the classic, right?), but sometimes I go rogue and make a quick green salad with a punchy mustard vinaigrette (I adore Deb’s version here).
Pro Tips (That Come From Mess Ups)
- Rushing the heat makes for burnt outsides and cold cheese. I once tried medium-high—never again!
- Actually, I find it works better if you let the cheese come to room temp for 10 minutes before assembling. Melts more beautifully.
- Butter goes on the outside—no matter what my brother claims. Try both if you’re curious, but I’m Team Outside Butter.
Kind of Random FAQ
- Can I use a different cheese? Oh, for sure! Anything that melts. Havarti? Yes. Swiss? Yes. Feta? Erm, not so much—it doesn’t melt the same way.
- Fresh or dried cranberries? I always have dried, so that’s what I use. Fresh work, but they’re more tart—and watch out for the seeds!
- What about gluten-free bread? Absolutely, though it can be a bit crumblier. Go gentle on the flipping.
- How do I stop the fillings from falling out? Trickier than it should be, honestly. I layer cheese both below and above the apples to help glue it all together—otherwise, just embrace the chaos! Also—don’t stack it sky high.
- Can I make this in a toaster oven? Yep! Just watch it closely; it’s less forgiving than a skillet. Or, here’s a cool guide from Kitchn: Toaster Oven Grilled Cheese.
Anyway, apples and cranberries in grilled cheese? Trust me—it’s a happy surprise for your tastebuds. If you try it, let me know how it came out (even if it turns out a bit weird looking!)


Ingredients
- 8 slices sourdough bread
- 2 tablespoons unsalted butter, softened
- 1 large crisp apple, thinly sliced
- ½ cup dried cranberries
- 8 slices sharp white cheddar cheese
- ¼ cup cream cheese, softened
- 1 tablespoon honey
- Pinch of ground cinnamon
Instructions
-
1In a small bowl, mix cream cheese, honey, and ground cinnamon until smooth.
-
2Butter one side of each sourdough bread slice. Place four bread slices, butter side down, on a clean surface.
-
3Spread the cream cheese mixture evenly over the unbuttered side of the four slices. Layer each with apple slices, dried cranberries, and two slices of sharp white cheddar cheese.
-
4Top with the remaining bread slices, butter side up.
-
5Heat a large skillet over medium heat. Cook each sandwich 4–5 minutes per side, until bread is golden brown and the cheese has melted.
-
6Remove from skillet, let cool briefly, then slice and serve immediately.
Approximate Information for One Serving
Nutrition Disclaimers
Number of total servings shown is approximate. Actual number of servings will depend on your preferred portion sizes.
Nutritional values shown are general guidelines and reflect information for 1 serving using the ingredients listed, not including any optional ingredients. Actual macros may vary slightly depending on specific brands and types of ingredients used.
To determine the weight of one serving, prepare the recipe as instructed. Weigh the finished recipe, then divide the weight of the finished recipe (not including the weight of the container the food is in) by the desired number of servings. Result will be the weight of one serving.
Did you make this recipe?
Please consider Pinning it!!