
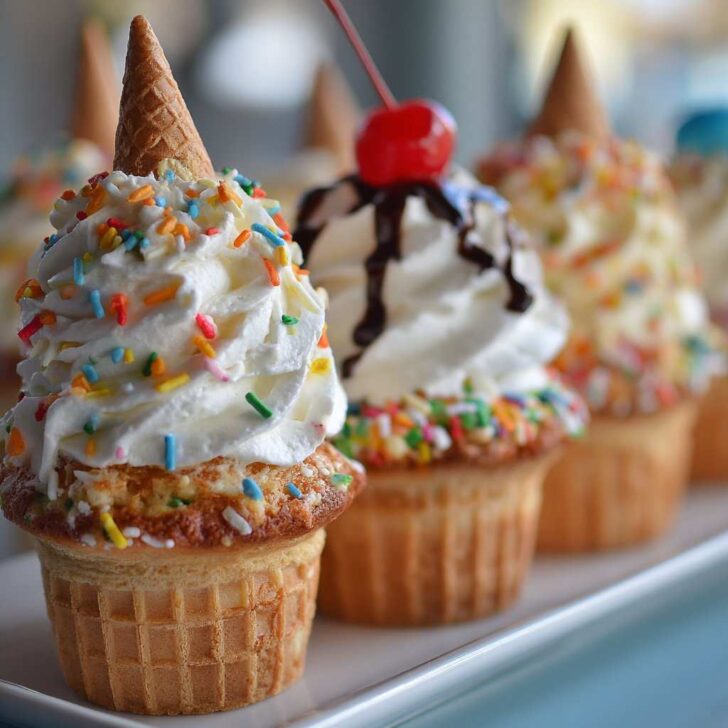

Hey y'all! Ready to take your cupcake game to the next level? Ice Cream Cone Cupcakes are the ultimate party treat—adorable, fun to eat, and bursting with flavor. These sweet little masterpieces combine the whimsy of a classic ice cream cone with the moist, fluffy goodness of a cupcake, making them perfect for birthdays, school events, or just a weekend baking adventure at home. Let's get cooking!
Why You'll Love This Ice Cream Cone Cupcakes Recipe
- Perfectly portable and mess-free, making them ideal for kids' parties and picnics.
- Super customizable with your favorite cake mix, frosting, and sprinkles.
- No special pans required—just pop the batter right into the cones!
- Moist, tender cupcakes with a delightful crunch from the cone base.
- They look just like real ice cream cones, guaranteed to wow your guests!
Ingredients for Ice Cream Cone Cupcakes
- 24 flat-bottomed ice cream cones
- 1 box cake mix (vanilla or chocolate), plus ingredients called for on box (usually 3 large eggs, ½ cup vegetable oil, 1 cup water)
- 2 cups buttercream frosting (homemade or store-bought)
- Colorful sprinkles or mini chocolate chips (for decorating)
- Maraschino cherries (optional)
How to Make Ice Cream Cone Cupcakes: Step-by-Step Directions
Step 1: Preheat & Prepare
Preheat your oven to 350°F (175°C). Stand 24 flat-bottomed ice cream cones in the wells of two 12-cup muffin tins. (This helps keep them upright while baking.)
Step 2: Mix the Cupcake Batter
In a large bowl, prepare the cake mix according to the package instructions. Beat until smooth and lump-free, about 2 minutes.
Step 3: Fill the Cones
Carefully spoon batter into each cone, filling only halfway (about 2 tablespoons). This allows space for the cupcakes to rise without overflowing.
Step 4: Bake the Ice Cream Cone Cupcakes
Bake in the preheated oven for 18-22 minutes, or until a toothpick inserted into the center comes out clean. Remove from oven and let cool completely in tins.
Step 5: Frost & Decorate
Once cooled, pipe or spread buttercream frosting on top of each cupcake to resemble a scoop of ice cream. Add sprinkles or chocolate chips, and top with a cherry if desired.


Notes for Perfect Ice Cream Cone Cupcakes
- To prevent cones from tipping, use crumpled foil to stabilize them in the muffin tins—or check out Betty Crocker's tips.
- If you’re making these ahead, frost just before serving to keep the cones crisp.
- Try using a cookie scoop for easy, even batter distribution in each cone.
Ice Cream Cone Cupcake Variations
- Funfetti Ice Cream Cone Cupcakes: Use funfetti cake mix and rainbow sprinkles for a festive look.
- Chocolate-Dipped Cones: Dip the tops of the cones in melted chocolate before filling for extra flavor and crunch.
- S'mores Style: Use chocolate cake mix and top with marshmallow frosting and crushed graham crackers.
Required Equipment for Ice Cream Cone Cupcakes
- 2 x 12-cup muffin tins
- Large mixing bowl
- Hand mixer or stand mixer
- Piping bag or spatula for frosting
- Cookie scoop (optional)
Ice Cream Cone Cupcakes Storage & Shelf Life
Store unfrosted cupcakes (in cones) in an airtight container at room temperature for up to 2 days. Once frosted, enjoy within 24 hours for best texture—cones may soften after a day. Avoid refrigerating, as this can make the cones soggy.
Serving Recommendations for Ice Cream Cone Cupcakes
- Pair with a scoop of real ice cream for an over-the-top dessert.
- Serve alongside fresh fruit or a cold glass of milk.
- Arrange on a decorative platter or cupcake stand for a show-stopping centerpiece.
Pro Tips for the Best Ice Cream Cone Cupcakes
- Don’t overfill cones—halfway is ideal for a perfect dome and no overflow (see Sally's Baking Addiction for photos).
- If you want extra crunchy cones, bake them for 2-3 minutes before adding the batter.
- Let cupcakes cool fully before frosting to prevent melting and sliding—check out more cupcake frosting tips.
Ice Cream Cone Cupcakes FAQ
- Can I use homemade cake batter instead of a boxed mix?
- Absolutely! Any favorite cupcake recipe works perfectly—just use about 3 cups of batter for 24 cones.
- How do I transport Ice Cream Cone Cupcakes without tipping?
- Try cutting holes in a cardboard box or using a cupcake carrier with deep wells; foil in muffin tins also helps keep cones upright.
- Can I freeze Ice Cream Cone Cupcakes?
- It's not recommended, as the cones can become soggy. Enjoy fresh for the best taste and texture!
Prep Time: 20 minutes
Cook Time: 20 minutes
Total Time: 40 minutes
Makes: 24 Ice Cream Cone Cupcakes
Ingredients
- 12 flat-bottomed ice cream cones
- 1 ½ cups all-purpose flour
- 1 cup granulated sugar
- ½ cup unsalted butter, softened
- 2 large eggs
- ½ cup milk
- 1 ½ teaspoons baking powder
- 1 teaspoon vanilla extract
- ¼ teaspoon salt
- Frosting and sprinkles for decoration
Instructions
-
1Preheat the oven to 350°F (175°C). Stand the ice cream cones upright in a muffin tin.
-
2In a large bowl, cream together the butter and sugar until light and fluffy. Beat in the eggs one at a time, then stir in the vanilla extract.
-
3In a separate bowl, whisk together the flour, baking powder, and salt. Gradually add the dry ingredients to the wet mixture, alternating with milk, and mix until just combined.
-
4Spoon the batter into the ice cream cones, filling each about ⅔ full.
-
5Bake for 18-20 minutes or until a toothpick inserted into the center comes out clean. Allow to cool completely.
-
6Frost the cooled cupcakes with your favorite frosting and decorate with sprinkles.
Approximate Information for One Serving
Nutrition Disclaimers
Number of total servings shown is approximate. Actual number of servings will depend on your preferred portion sizes.
Nutritional values shown are general guidelines and reflect information for 1 serving using the ingredients listed, not including any optional ingredients. Actual macros may vary slightly depending on specific brands and types of ingredients used.
To determine the weight of one serving, prepare the recipe as instructed. Weigh the finished recipe, then divide the weight of the finished recipe (not including the weight of the container the food is in) by the desired number of servings. Result will be the weight of one serving.
Did you make this recipe?
Please consider Pinning it!!