

When summer rolls around, there's nothing quite like indulging in sweet, colorful treats that bring smiles to everyone's faces. One such delightful dessert is the Ice Cream Cone Cake Pop. These whimsical confections combine the charm of ice cream cones with the rich taste of cake pops, making them perfect for parties, picnics, or just a fun baking project with the kids.
What Are Ice Cream Cone Cake Pops?
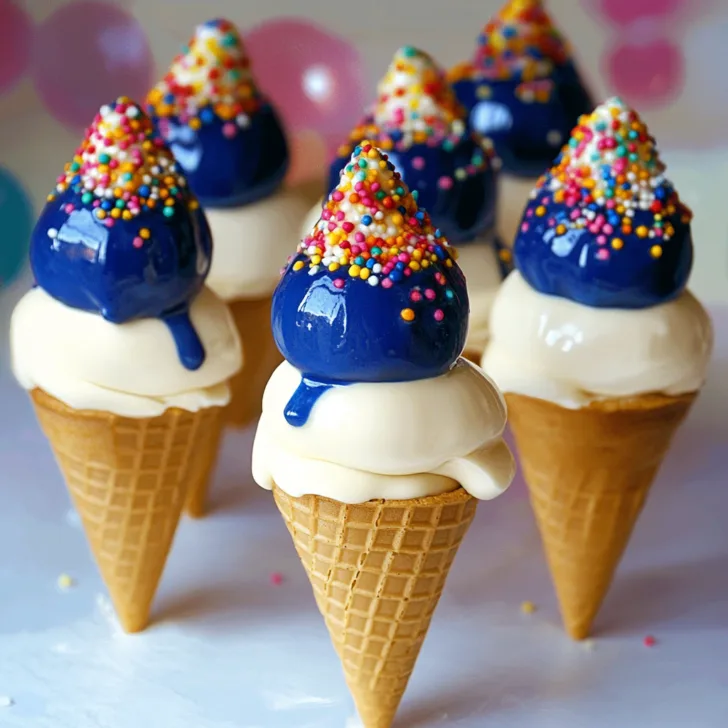
Ice Cream Cone Cake Pops are a creative twist on traditional cake pops. Instead of being served on sticks, the cake mixture is shaped into balls, placed atop mini ice cream cones, and decorated to resemble scoops of ice cream. The result is a visually appealing treat that mimics the look of an ice cream cone but offers the delightful surprise of cake inside.
Why You'll Love This Recipe
- Fun and Festive: Their playful appearance makes them a hit at any gathering.
- Customizable: Easily adapt the colors and flavors to match any theme or preference.
- No Melting Worries: Unlike real ice cream, these won't melt, making them ideal for outdoor events.
- Kid-Friendly: A great project to involve children in the kitchen.
Ingredients You'll Need
- Cake: Your favorite flavor, baked and cooled.
- Frosting: Complementary to your cake flavor.
- Mini Ice Cream Cones: Available at most grocery stores.
- Candy Melts or Chocolate: For coating and decorating.
- Sprinkles and Toppings: To add flair and mimic ice cream toppings.
- Lollipop Sticks (Optional): For added stability during assembly.
Equipment Needed
- Mixing bowls
- Baking sheet
- Parchment paper
- Microwave-safe bowls
- Spoon or cookie scoop
- Cooling rack
Step-by-Step Instructions
1. Prepare the Cake Mixture
Bake your chosen cake flavor according to the recipe or package instructions. Once cooled, crumble the cake into fine crumbs in a large mixing bowl. Add frosting gradually, mixing until the mixture holds together when pressed. The consistency should be similar to cookie dough.
2. Shape the Cake Balls
Using a spoon or cookie scoop, form the cake mixture into balls approximately 1 inch in diameter. Place them on a parchment-lined baking sheet. Once all balls are formed, refrigerate them for about 30 minutes to firm up.
3. Attach to Cones
If using lollipop sticks, dip one end into melted candy melts or chocolate and insert it halfway into a cake ball. Then, dip the top rim of a mini ice cream cone into the melted candy and gently press it onto the bottom of the cake ball, ensuring it adheres well. Repeat for all cake balls. Allow them to set for a few minutes.
4. Decorate
Melt your chosen candy melts or chocolate in a microwave-safe bowl, stirring until smooth. Dip the cake ball portion of each cone into the melted coating, allowing any excess to drip off. Before the coating sets, add sprinkles or other decorations to mimic ice cream toppings. Place the finished cake pops upright in a stand or cooling rack to set completely.
Tips for Success
- Chill the Cake Balls: Refrigerating the cake balls before dipping helps them maintain their shape and stay on the cones.
- Use Quality Candy Melts: This ensures a smooth coating and better taste.
- Get Creative: Experiment with different cake flavors, coatings, and toppings to suit your event or personal preference.Poetry & Pies
Serving Suggestions
Serve these delightful treats at birthday parties, summer barbecues, or as a fun dessert option at any gathering. Arrange them in a decorative stand or wrap them individually in clear bags tied with colorful ribbons for party favors.
Storage
Store the finished cake pops in an airtight container at room temperature for up to 3 days. For longer storage, refrigerate them for up to a week. If refrigerated, allow them to come to room temperature before serving for the best taste and texture.
FAQs
Q: Can I make these ahead of time?
A: Yes, you can prepare the cake balls and store them in the refrigerator for up to 2 days before assembling and decorating.
Q: What if I can't find mini ice cream cones?
A: You can use regular-sized cones and cut them down to the desired size or use them as is for larger cake pops.
Q: Can I use homemade cake and frosting?
A: Absolutely! Homemade cake and frosting work wonderfully and allow for more flavor customization.
Q: How do I prevent the cake pops from falling off the cones?
A: Ensuring the cake balls are properly chilled and using melted candy as "glue" between the cake ball and cone helps secure them in place.
Q: Are there alternatives to candy melts for coating?
A: Yes, you can use tempered chocolate or almond bark as alternatives to candy melts.


Learn how to make colorful, no-melt Ice Cream Cone Cake Pops—perfect for summer parties and birthdays.
Ingredients
- 1 prepared cake, crumbled (any flavor)
- ½ to ¾ cup frosting
- 24 mini ice cream cones
- 1 ½ cups candy melts or melted chocolate
- Sprinkles or toppings of choice
Directions
- Bake and cool cake. Crumble into a bowl. Mix with frosting until dough forms.
- Form into 1-inch balls. Chill for 30 minutes to firm.
- Dip the cone rim in melted candy and press onto cake ball to attach.
- Dip top of cake ball into melted coating. Add sprinkles before it sets.
- Set upright until fully hardened. Serve or store as needed.