

Hey y'all! If you're searching for the ultimate treat to delight kids and adults this October, these Halloween Jack-O-Lantern Hand Pies are just the ticket. With a flaky, buttery crust and sweet, spiced pumpkin filling, these adorable mini pies are perfect for parties, Halloween gatherings, or just a fun weekend baking project. Whether you're hosting a spooky bash or simply want to surprise your family, these hand pies are guaranteed to bring smiles. Let's get cooking!
Why You'll Love This Halloween Jack-O-Lantern Hand Pies Recipe
- Super easy to make with store-bought or homemade pie dough.
- Perfectly portioned for snacking, party trays, and lunchbox treats.
- Fun and festive design that will thrill kids and adults alike.
- Warmly spiced pumpkin filling packed with cozy fall flavors.
- Can be customized with your favorite fillings or gluten-free dough.
Halloween Jack-O-Lantern Hand Pies Ingredients
- 2 refrigerated pie crusts (or homemade)
- ¾ cup pumpkin puree
- ¼ cup brown sugar, packed
- ½ teaspoon ground cinnamon
- ¼ teaspoon ground ginger
- ⅛ teaspoon ground nutmeg
- ¼ teaspoon salt
- 1 large egg (for egg wash)
- 1 tablespoon milk
- Optional: decorating sugar for sprinkling
How to Make Halloween Jack-O-Lantern Hand Pies
Step 1: Prep the Dough & Filling
Preheat your oven to 375°F (190°C) and line a baking sheet with parchment paper. In a medium bowl, mix together the pumpkin puree, brown sugar, cinnamon, ginger, nutmeg, and salt until smooth and well combined.
Step 2: Cut Out Jack-O-Lantern Shapes
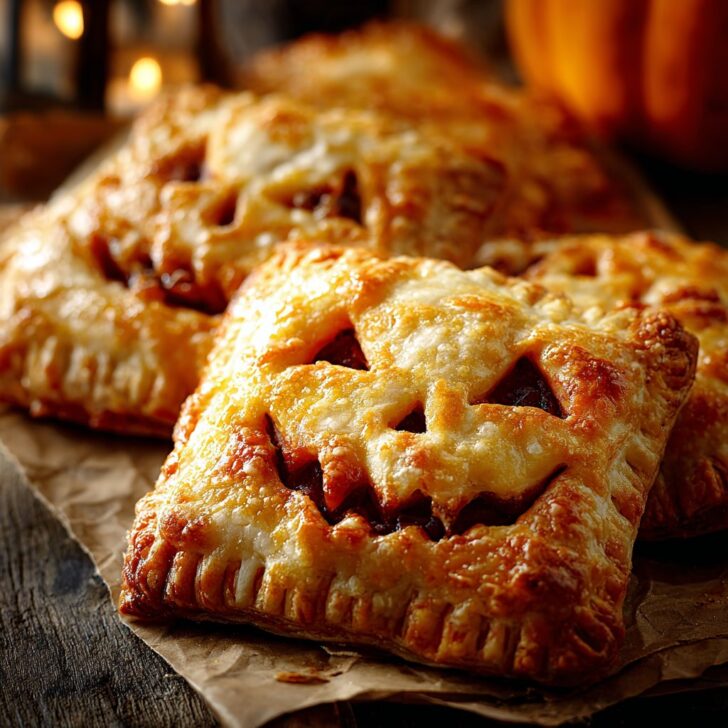
Roll out the pie crusts on a lightly floured surface. Use a pumpkin-shaped cookie cutter (about 3 to 4 inches wide) to cut out an even number of shapes. With a small sharp knife, cut jack-o-lantern faces on half of the pumpkin shapes for the tops.
Step 3: Assemble the Hand Pies
Place about a tablespoon of filling in the center of each bottom pumpkin shape, leaving a small border. Brush the border with a bit of water. Gently place a jack-o-lantern face top over each, pressing the edges to seal. Use a fork to crimp the edges for a decorative touch.
Step 4: Egg Wash & Bake
In a small bowl, whisk together the egg and milk. Brush each hand pie with the egg wash, then sprinkle with decorating sugar if desired. Bake for 17-20 minutes, or until golden brown and crisp.
Step 5: Cool & Serve
Let the Halloween Jack-O-Lantern Hand Pies cool on a wire rack for 10 minutes. Serve warm or at room temperature and watch them disappear!


Notes for Perfect Halloween Jack-O-Lantern Hand Pies
- Chill the assembled pies before baking for extra flaky crusts.
- Don’t overfill to avoid leaks during baking.
- Learn more about perfecting pie crusts from Sally's Baking Addiction.
Halloween Jack-O-Lantern Hand Pies Variations
- Apple Cinnamon: Swap pumpkin filling for finely diced apples tossed with cinnamon and sugar.
- Nutella & Banana: Add a spoonful of Nutella and banana slices for a chocolatey twist.
- Cherry Pie: Use canned cherry pie filling for a sweet-tart treat with a pop of color.
Equipment for Halloween Jack-O-Lantern Hand Pies
- Pumpkin-shaped cookie cutter (3-4 inches)
- Baking sheet
- Parchment paper
- Mixing bowls
- Pastry brush
- Sharp paring knife
- Fork
Storing Your Halloween Jack-O-Lantern Hand Pies
Store leftover hand pies in an airtight container at room temperature for up to 2 days, or refrigerate for up to 5 days. For longer storage, freeze baked pies for up to 2 months; thaw and reheat at 300°F (150°C) for 10 minutes to refresh the crust.
Serving Recommendations & Pairings for Halloween Jack-O-Lantern Hand Pies
- Serve with warm apple cider or hot chocolate for a cozy Halloween treat.
- Pair with vanilla ice cream for a decadent dessert option.
- Arrange on a festive platter alongside caramel popcorn and candy corn for a Halloween sweets spread.
Halloween Jack-O-Lantern Hand Pies Pro Tips
- Freeze your cookie cutter if the pie dough gets too soft—it’ll make cleaner cuts (King Arthur Baking).
- Use a pastry bag for neater filling application and less mess.
- Try brushing with a cinnamon-sugar blend for extra sparkle and flavor.
Halloween Jack-O-Lantern Hand Pies FAQ
- Can I use homemade pie crust?
Absolutely! Homemade pie crust adds a delicious, buttery flavor—just keep it chilled and roll it thinly. - Can I make these hand pies ahead of time?
Yes, assemble and freeze unbaked pies for up to 2 weeks. Bake straight from frozen, adding 2-3 minutes to the baking time. - How do I keep the filling from leaking?
Seal the edges well and avoid overfilling. Crimping with a fork and brushing with egg wash helps lock in the filling. For more tips, check out Bon Appetit’s pie crust guide.
Prep time: 20 minutes
Cook time: 20 minutes
Total time: 40 minutes
Makes: 10-12 hand pies


Ingredients
- 2 sheets refrigerated pie crust
- ½ cup canned pumpkin puree
- 2 tablespoons brown sugar
- 1 teaspoon pumpkin pie spice
- ¼ teaspoon ground cinnamon
- 1 large egg
- 1 tablespoon milk
- 1 tablespoon granulated sugar (for sprinkling)
Instructions
-
1Preheat the oven to 375°F (190°C) and line a baking sheet with parchment paper.
-
2In a small bowl, mix together the pumpkin puree, brown sugar, pumpkin pie spice, and ground cinnamon until well combined.
-
3Unroll the pie crusts and use a pumpkin-shaped cookie cutter to cut out 16 shapes. On half of the shapes, use a small knife to cut jack-o-lantern faces.
-
4Place a spoonful of pumpkin filling in the center of each plain pumpkin shape, leaving a border around the edges.
-
5Brush the edges with a beaten egg mixed with milk. Top with the jack-o-lantern face crusts and press the edges to seal with a fork.
-
6Brush the tops with egg wash, sprinkle with granulated sugar, and bake for 18-20 minutes until golden brown. Cool slightly before serving.
Approximate Information for One Serving
Nutrition Disclaimers
Number of total servings shown is approximate. Actual number of servings will depend on your preferred portion sizes.
Nutritional values shown are general guidelines and reflect information for 1 serving using the ingredients listed, not including any optional ingredients. Actual macros may vary slightly depending on specific brands and types of ingredients used.
To determine the weight of one serving, prepare the recipe as instructed. Weigh the finished recipe, then divide the weight of the finished recipe (not including the weight of the container the food is in) by the desired number of servings. Result will be the weight of one serving.
Did you make this recipe?
Please consider Pinning it!!