
Oh, Fudgy Red Velvet Crinkle Christmas Cookies—Here We Go Again
I have to tell you, the first time I made these Fudgy Red Velvet Crinkle Christmas Cookies (say that five times fast), my kitchen looked like a very enthusiastic toddler had gotten into the food coloring. There was cocoa powder on the dog, and I swear I found a sugar trail into the hallway. But—worth it. Because these cookies? They save Christmas. Well, or at least my sanity during present wrapping marathons. My cousin Clara nearly inhaled the first batch, even though she claimed she “doesn’t like sweets.” Uh-huh. Sure, Clara. You try eating just one.
Why You’ll Love These (Or—Why I Can’t Stop Making Them)
Honestly, I jet out this recipe when I need something that looks impressive (sparkly, red, like you actually put in effort), but the reality is, it’s a bit of a lazy baker’s dream. My family goes a bit bonkers for these because the centers stay so gooey—almost like a brownie’s smitten cousin hiding in a cookie outfit. Plus, if you’re like me and always end up with a sad, lumpy pile of cookies from other recipes, these are basically impossible to make ugly. Somewhere along the way, I cracked the code for not staining every single spoon red, but it’s not foolproof. I mean, who needs pristine utensils anyway?
What You’ll Need (And My Cheeky Swaps)
- 1 cup all-purpose flour (sometimes I cheat with half cake flour for extra tenderness—up to you!)
- 1/2 cup unsweetened cocoa powder (Hershey’s works, but those pretentious Dutch-processed ones are fine, too)
- 1 tsp baking powder
- 1/4 tsp salt (I usually just throw in a healthy pinch. Sea salt is nice.)
- 3/4 cup granulated sugar
- 1/4 cup brown sugar (if you’re out, all white sugar works, but brown gives a wee bit more chew)
- 2 large eggs
- 1/2 cup butter, melted and cooled (in a rush, I use olive oil—just a bit lighter, but still works)
- 2 tsp vanilla extract (my gran swears by Watkins, but any will do)
- 1 tbsp red food coloring (I know, but it isn’t Christmas without the jazz hands. Gel food coloring works better and stains less, probably)
- 1 cup powdered sugar, for rolling
How To Make ‘Em (AKA, Don’t Panic About the Sticky Bits)
- First things first, find two clean-ish mixing bowls. In one, whisk the flour, cocoa, baking powder, and salt together. (If you accidentally toss in two teaspoons of baking powder instead of one—been there—it’s salvageable. They’ll just puff.)
- In your other, bigger bowl, get the sugars, eggs, melted butter, and vanilla mingling. Whisk until it looks kind of glossy. Here’s where I always stick a finger in to check for sweetness—don’t judge me.
- Toss the dry mix into the wet, followed by the glorious, slightly alarming red food coloring. Stir until just mixed. (It’ll look almost velvet upholstery red—if it seems off, add a smidge more color. Or don’t. Life’s too short.)
- Now the key part: cover and chill the dough for 60 minutes. If you skip this, the cookies will splat—trust me. Sometimes I get impatient and only wait 30; they still taste good, but, well…not quite as thick and crinkly.
- Preheat the oven to 350°F (that’s 175°C, if you’re not in the US) and grab a lined baking sheet. I use parchment, but I ran out one year and just buttered the pan. It worked (mostly).
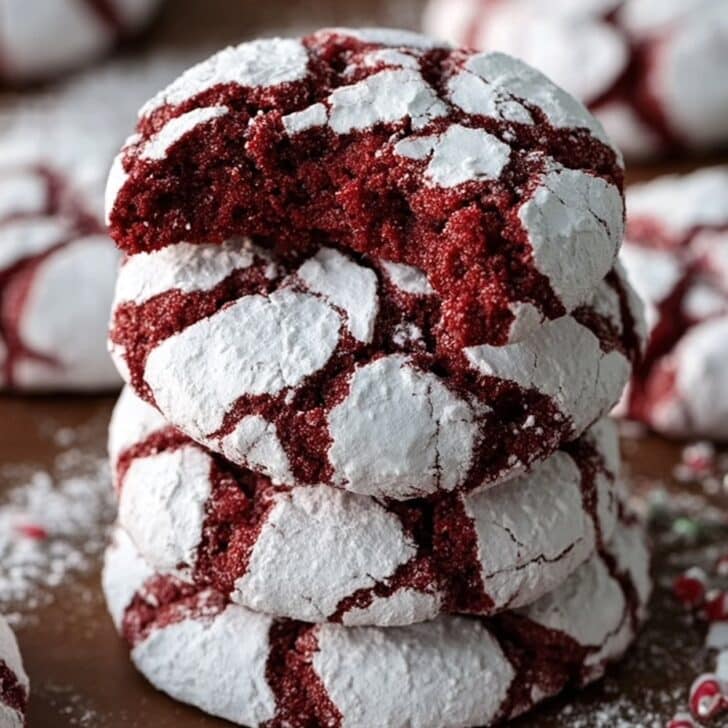
- Scoop heaping tablespoons of dough and roll each into a ball (ish—mine are always kind of wonky). Roll thoroughly in powdered sugar so they look like tiny snowballs. Don’t skimp, or the crinkle effect won’t really pop.
- Bake 10–12 minutes. The centers will look a bit gooey; that’s right. They’ll firm as they cool. Let them rest on the tray a few minutes before transferring, unless you want cookie casualties (and yes, eating the casualties is allowed).
Notes From a Reformed Over-Baker
- Actually, every oven is a bit moody. If the bottoms brown too quickly, lower the rack.
- I tried freezing the balls for “later use,” but found the powdered sugar sort of disappears when baked straight form frozen. Best to freshen it after thawing.
- If your dough seems more fudge than dough, add a light spoon of flour. One time I added too much cocoa and didn’t regret it—super chocolatey. But maybe that’s just me.
I’ve Tried These Variations (So You Don’t Have To)
- White chocolate chunks inside, oh my. Not traditional, but everyone fought for the last one.
- Peppermint extract instead of vanilla—too toothpaste-adjacent for my taste. Someone else might like it, though.
- Swapped half the butter for Greek yogurt once on a health kick. Didn’t love it, but hey, it wasn’t tragic.
Tools and Kitchen MacGyvering
I use my trusty hand mixer (which sounds like a lawnmower) but a plain old whisk and some muscle gets the job done. If you don’t have parchment, just use an old nonstick pan—worse case, more crispy edges. Oh, and rolling in powdered sugar bare-handed is messier but more fun than gloves, promise.

Storing Your Precious Cookies (If They Last)
In a sealed tin these cookies stay fudgy for about 3 days—though honestly, in my house it never lasts more than a day! You can freeze the dough balls if needed, but freeze without powdered sugar on them for best results. King Arthur Baking also has a great round up of storage tips, actually. I always forget and end up eating them half frozen from the freezer, to be honest.
How We Like To Serve ‘Em
No big surprises here—warm, with too much hot chocolate and a home made marshmallow or two (store bought is fine—it’s Christmas, not Top Chef). Or with a glass of milk if the hot chocolate is going to the kids. Sometimes we sprinkle on crushed candy canes if we’re feeling festive. Up to you!
Lessons From the Cookie Trenches
- That time I tried “rushing the chill step”…yeah, ended up with flat pancake cookies. Learn from me: chill out (pun intended).
- It’s tempting to overbake them because they look undone; resist. Once I left them an extra 2 min and lost all the gooey goodness.
- Red food coloring is basically permanent on shirts. Wear an apron—or something you don’t mind getting a little jazzy.
Wait, Can I…?
Q: Can I make these ahead?
Totally—chill the dough overnight if you want to get ahead. Scooping’s actually easier cold.
Q: Do they have to be red?
Well, not to be the cookie police, but the red is kind of the point! Still, the cookies taste amazing even plain. Sometimes I make a batch without color for Valentine’s and call them “mystery crinkles.”
Q: Can I double this?
Yup—I do if we have a big family do. Just be prepared: your arm might fall off if you’re not using a mixer, as the dough thickens up quick.
Q: Can I reduce the sugar for less sweetness?
You can, but they get a bit less chewy. Maybe cut by 20 percent tops. Or, just eat them with less guilt like I do.
And if you run into problems—honestly, just dunk them in ice cream, and nobody will notice.

Ingredients
- 1 1/4 cups all-purpose flour
- 1/4 cup unsweetened cocoa powder
- 1 teaspoon baking powder
- 1/4 teaspoon salt
- 3/4 cup granulated sugar
- 1/4 cup unsalted butter, melted
- 2 large eggs
- 1 teaspoon vanilla extract
- 1 tablespoon red food coloring
- 3/4 cup powdered sugar (for coating)
Instructions
-
1Preheat oven to 350°F (175°C) and line two baking sheets with parchment paper.
-
2In a medium bowl, whisk together flour, cocoa powder, baking powder, and salt.
-
3In a large bowl, mix the granulated sugar, melted butter, eggs, vanilla extract, and red food coloring until smooth and well combined.
-
4Gradually add the dry ingredients to the wet mixture, stirring until a soft dough forms. Chill the dough in the refrigerator for 30 minutes if sticky.
-
5Scoop tablespoonfuls of dough, roll into balls, then coat generously in powdered sugar. Place balls 2 inches apart on prepared baking sheets.
-
6Bake for 11-12 minutes until cookies are puffed and crinkled. Cool on baking sheet for 5 minutes before transferring to a wire rack.
Approximate Information for One Serving
Nutrition Disclaimers
Number of total servings shown is approximate. Actual number of servings will depend on your preferred portion sizes.
Nutritional values shown are general guidelines and reflect information for 1 serving using the ingredients listed, not including any optional ingredients. Actual macros may vary slightly depending on specific brands and types of ingredients used.
To determine the weight of one serving, prepare the recipe as instructed. Weigh the finished recipe, then divide the weight of the finished recipe (not including the weight of the container the food is in) by the desired number of servings. Result will be the weight of one serving.
Did you make this recipe?
Please consider Pinning it!!