

Hey y'all! If you're craving the fresh flavors of sushi but don't have the time (or skill!) to roll your own, this Canned Tuna Sushi Bowl will absolutely blow your mind! It's easy, budget-friendly, and packs all the tangy, umami goodness of your favorite sushi bar right into a vibrant rice bowl. Perfect for busy weeknights, quick lunches, or impressing your friends at a casual dinner. Let's get cooking!
Why You'll Love This Canned Tuna Sushi Bowl
- Lightning-fast prep—ready in just 15 minutes!
- All the flavors of restaurant sushi at home, on a budget.
- Perfectly customizable with your favorite veggies or toppings.
- Super healthy—packed with protein and colorful produce.
- Great for meal prep, lunches, or a satisfying weeknight dinner.
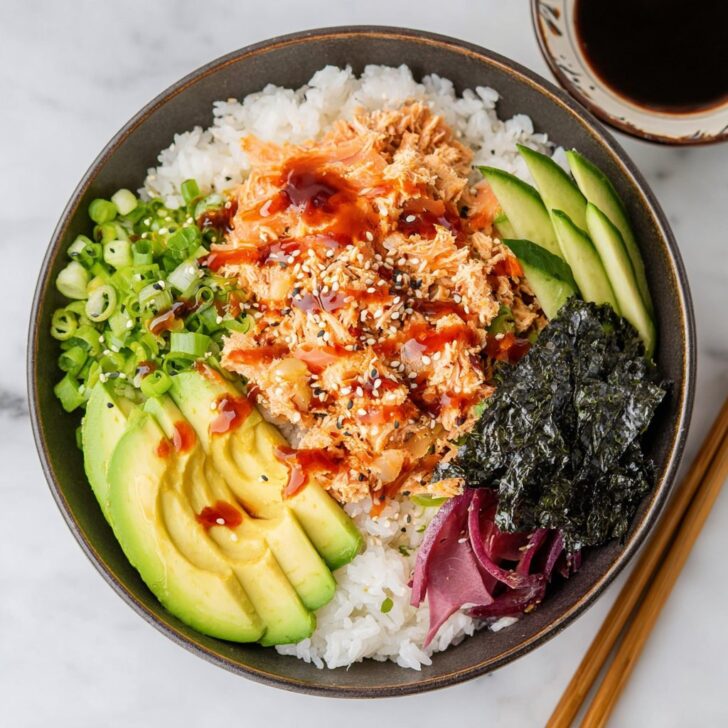
Ingredients for Canned Tuna Sushi Bowl
- 2 (5 oz) cans tuna, drained
- 2 cups cooked sushi rice (or other short-grain rice)
- 3 tablespoon mayonnaise
- 1 tablespoon sriracha (optional, for spicy mayo)
- ½ avocado, sliced
- ½ cucumber, thinly sliced
- 1 small carrot, julienned or grated
- 2 tablespoon soy sauce
- 1 teaspoon rice vinegar
- 1 teaspoon sesame oil
- 1 teaspoon toasted sesame seeds
- 1 sheet nori (seaweed), cut into strips
- 1 green onion, thinly sliced
How to Make Your Canned Tuna Sushi Bowl
Step 1: Prepare the Rice
If you haven't already, cook your sushi rice according to the package instructions. Fluff it up and let it cool slightly so it’s warm, not hot.
Step 2: Make Spicy Tuna
In a bowl, mix the drained canned tuna with mayonnaise and sriracha (for that spicy kick!). Season with a splash of soy sauce if desired.
Step 3: Assemble the Canned Tuna Sushi Bowl
Divide the rice between two serving bowls. Top each with the spicy tuna mixture, sliced avocado, cucumber, and carrots. Drizzle soy sauce, rice vinegar, and sesame oil evenly over the bowls.
Step 4: Add Toppings
Sprinkle toasted sesame seeds, nori strips, and green onions over each bowl. Add any other favorite sushi toppings (see below for variations!).
Step 5: Serve
Enjoy immediately while fresh!
Notes for Your Canned Tuna Sushi Bowl
- For best rice texture, rinse your rice thoroughly before cooking—it removes extra starch for that authentic sticky sushi texture! Learn more about cooking sushi rice here.
- If you can't find sushi rice, short-grain white rice or even brown rice also work well.
- Upgrade your bowl with a drizzle of eel sauce or ponzu for extra umami (what is ponzu?).


Variations on the Canned Tuna Sushi Bowl
- California-Style: Add imitation crab, masago (fish roe), and swap spicy mayo for wasabi-mayo.
- Vegan: Substitute canned chickpeas or tofu for tuna and use vegan mayo.
- Poke-Inspired: Add edamame, mango, and sprinkle furikake for a Hawaiian twist.
Required Equipment for the Canned Tuna Sushi Bowl
- Rice cooker or medium saucepan
- Mixing bowls
- Sharp knife
- Cutting board
- Serving bowls
Storage Instructions for Canned Tuna Sushi Bowl
Store all components separately in airtight containers for best results. The spicy tuna mixture and veggies keep for up to 2 days in the fridge, while cooked rice is best eaten within 24 hours. Assemble right before eating to maintain freshness and texture.
Canned Tuna Sushi Bowl Pairings & Serving Recommendations
- Serve with a side of miso soup or a crisp seaweed salad.
- Pair with pickled ginger or quick-pickled radishes for a tangy contrast.
- A glass of chilled green tea or a light, crisp sake makes the perfect beverage match! Learn more about sake here.
Pro Tips for the Best Canned Tuna Sushi Bowl
- Always use high-quality canned tuna in water (not oil) for an authentic, clean flavor. Check out the best brands here.
- Don't skip the rice vinegar—it adds that essential sushi tanginess!
- Prep toppings while the rice cooks so everything comes together smoothly and quickly.
FAQ: Canned Tuna Sushi Bowl
Can I use any type of canned tuna?
Yes! Chunk light or albacore both work well—just make sure it's drained thoroughly for best results.
Is it safe to eat cold tuna in a sushi bowl?
Absolutely. Since the tuna is cooked and canned, it's totally safe, even when served cold.
Can I prep Canned Tuna Sushi Bowl ahead of time?
You can prep all toppings and the tuna mix ahead, but assemble the bowl right before eating so everything stays fresh and delicious.
Prep Time: 10 minutes
Total Time: 15 minutes
Servings: 2 generous bowls


Ingredients
- 2 cups cooked sushi rice
- 2 cans tuna in water, drained
- 1 tablespoon soy sauce
- 1 tablespoon mayonnaise
- 1 teaspoon sriracha (optional)
- 1 cup cucumber, diced
- 1 avocado, sliced
- 1 sheet nori, cut into strips
- 2 tablespoons pickled ginger
- 1 tablespoon sesame seeds
Instructions
-
1In a mixing bowl, combine the drained canned tuna with mayonnaise, soy sauce, and sriracha if using. Mix until well blended.
-
2Divide cooked sushi rice evenly among four serving bowls.
-
3Top the rice in each bowl with the tuna mixture, diced cucumber, and sliced avocado.
-
4Garnish each bowl with nori strips, pickled ginger, and sesame seeds.
-
5Serve immediately and enjoy your homemade canned tuna sushi bowl.
Approximate Information for One Serving
Nutrition Disclaimers
Number of total servings shown is approximate. Actual number of servings will depend on your preferred portion sizes.
Nutritional values shown are general guidelines and reflect information for 1 serving using the ingredients listed, not including any optional ingredients. Actual macros may vary slightly depending on specific brands and types of ingredients used.
To determine the weight of one serving, prepare the recipe as instructed. Weigh the finished recipe, then divide the weight of the finished recipe (not including the weight of the container the food is in) by the desired number of servings. Result will be the weight of one serving.
Did you make this recipe?
Please consider Pinning it!!