
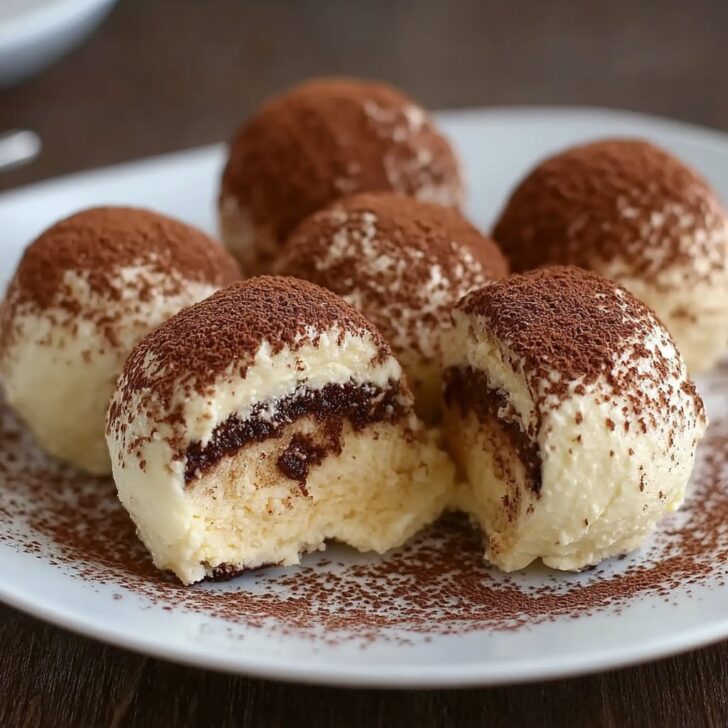

Hey y'all! If you adore the rich flavors of classic tiramisu but don’t have the time (or patience) for layers and chilling, my 10 Minute Tiramisu Balls Recipe is your new shortcut to dessert bliss. These luscious, no-bake bites deliver all the creamy, coffee-kissed magic of tiramisu in a portable snack—perfect for parties, potlucks, or when you just need a quick sweet fix. Ready to indulge? Let's get cooking!
Why You'll Love This 10 Minute Tiramisu Balls Recipe
- Delivers all the classic tiramisu flavors in just 10 minutes — no oven or fancy tools needed.
- No-bake, fuss-free, and mess-free, making it perfect for any time of year.
- Ideal for parties, gifts, or a make-ahead treat that everyone will rave about.
- Easy to customize with your favorite add-ins or dietary swaps.
- Beautifully creamy inside with a decadent, cocoa-coated exterior.
10 Minute Tiramisu Balls Recipe Ingredients
- 1 cup (120g) ladyfinger crumbs (about 10-12 ladyfingers, crushed)
- 8 oz (225g) mascarpone cheese, softened
- ⅓ cup (40g) powdered sugar
- 3 tablespoon strong espresso or very strong coffee, cooled
- 1 tablespoon coffee liqueur (such as Kahlúa, optional for adults)
- ½ teaspoon vanilla extract
- Pinch of salt
- ½ cup (60g) unsweetened cocoa powder, for rolling
How to Make 10 Minute Tiramisu Balls: Step-by-Step Directions
Step 1: Crush the Ladyfingers
In a food processor or by sealing the ladyfingers in a zip-top bag and crushing with a rolling pin, pulse or crush until you get fine crumbs.
Step 2: Mix the Creamy Center
In a medium bowl, combine the softened mascarpone, powdered sugar, espresso, coffee liqueur (if using), vanilla extract, and salt. Mix well until smooth and silky.
Step 3: Form the Mixture
Add the ladyfinger crumbs to the creamy mixture. Stir everything together until evenly combined and you have a soft, pliable dough.
Step 4: Shape into Balls
Using a cookie scoop or your hands, scoop out portions (about 1 heaping tablespoon each) and roll into balls. You should get 14–16 bite-sized tiramisu balls.
Step 5: Roll in Cocoa Powder
Place the cocoa powder in a shallow bowl. Roll each tiramisu ball in cocoa powder until well-coated.
Step 6: Chill & Serve
If possible, refrigerate for 15–30 minutes to set before serving, but you can also enjoy them immediately!
Notes for the 10 Minute Tiramisu Balls Recipe
- For a boozy touch, don’t skip the coffee liqueur, but if you’re serving kids, simply leave it out.
- These balls can be made gluten-free by swapping in gluten-free ladyfingers (check this guide).
- For easy cleanup, use parchment paper on your surface for rolling and shaping.
10 Minute Tiramisu Balls Recipe Variations
- Nutty Crunch: Add ¼ cup finely chopped toasted hazelnuts or almonds to the mixture before shaping.
- Chocolate-Dipped: Dip chilled balls halfway in melted dark chocolate and let set for an extra decadent twist.
- Vegan Version: Use vegan cream cheese and plant-based ladyfingers—see vegan mascarpone options here.


Equipment Needed for 10 Minute Tiramisu Balls Recipe
- Mixing bowls
- Food processor or rolling pin (for crushing ladyfingers)
- Spatula or spoon
- Small cookie scoop or tablespoon
- Shallow bowl (for cocoa powder)
Storage & Shelf Life for Tiramisu Balls
Store tiramisu balls in an airtight container in the refrigerator for up to 4 days. For longer storage, you can freeze them (layer between parchment paper) for up to 2 months; thaw in the fridge before serving.
Serving and Pairing Ideas for 10 Minute Tiramisu Balls Recipe
- Serve with espresso, cappuccino, or dessert wine like Vin Santo.
- Pair with fresh berries or a dollop of whipped cream for an extra-special presentation.
- Arrange on a platter and dust with extra cocoa for that cafe-style look!
Pro Tips for Perfect 10 Minute Tiramisu Balls
- Use high-quality espresso or coffee for big, authentic flavor (see the best espresso makers here).
- Don’t over-mix the mascarpone; gentle folding keeps it creamy, not dense.
- If your dough is too sticky, chill it for 10 minutes to make rolling easier.
Frequently Asked Questions: 10 Minute Tiramisu Balls Recipe
Can I make tiramisu balls ahead of time?
Absolutely! Simply store them in an airtight container in the refrigerator for up to 4 days, or freeze as described above.
How can I make these tiramisu balls alcohol-free?
Just leave out the coffee liqueur; the flavor is still fantastic thanks to the espresso, vanilla, and mascarpone.
Can I use cream cheese instead of mascarpone?
Yes, full-fat cream cheese is an easy swap if mascarpone is unavailable, but the texture will be a tad firmer and tangier.


Ingredients
- 1 cup ladyfinger biscuits, finely crushed
- 4 oz cream cheese, softened
- ⅓ cup mascarpone cheese
- ¼ cup strong brewed espresso, cooled
- ⅓ cup powdered sugar
- ½ teaspoon vanilla extract
- 2 tablespoon cocoa powder, for coating
- 1 tablespoon coffee liqueur (optional)
Instructions
-
1Crush the ladyfinger biscuits into fine crumbs using a food processor or by placing them in a ziplock bag and smashing with a rolling pin.
-
2In a large bowl, combine the crushed ladyfingers, cream cheese, mascarpone cheese, powdered sugar, vanilla extract, espresso, and coffee liqueur if using.
-
3Mix all the ingredients together until a sticky dough forms. If the mixture is too wet, add a bit more crushed biscuits.
-
4Scoop out about a tablespoon of the mixture and roll into balls using your hands.
-
5Roll each ball in cocoa powder to coat evenly.
-
6Refrigerate the tiramisu balls for at least 10 minutes before serving.
Approximate Information for One Serving
Nutrition Disclaimers
Number of total servings shown is approximate. Actual number of servings will depend on your preferred portion sizes.
Nutritional values shown are general guidelines and reflect information for 1 serving using the ingredients listed, not including any optional ingredients. Actual macros may vary slightly depending on specific brands and types of ingredients used.
To determine the weight of one serving, prepare the recipe as instructed. Weigh the finished recipe, then divide the weight of the finished recipe (not including the weight of the container the food is in) by the desired number of servings. Result will be the weight of one serving.
Did you make this recipe?
Please consider Pinning it!!